Lesson 2: Micrometers
WORD LIST
| 1. spindle | a part of the outside micrometer that, along with the anvil, holds the thing to be measured.
Example: Be sure to tighten the spindle against the workpiece. |
| 2. snug | tight, but not too tight.
Example: Carlos, make sure the spindle is snug around that part, if you want a correct measurement. |
| 3. case | a box or container used to store and protect things.
Example: Faustino put the micrometer back into its case. |
| 4. features | a number of parts that are special to a tool.
Example: One of the features of this micrometer is a lock lever. |
| 5. vernier scale | a special scale whose numbers are always one more than the scale they’re matched with.
Example: When reading a vernier scale, look for a line that exactly matches a main scale line. |
| 6. to be worth | to have a certain value.
Example: If 2a = 10, then a is worth 5. |
| 7. results | The numbers that we get as answers to part or all of a math problem.
Example: Manuel wrote down the partial results and then the total. |
| 8. thickness | How wide something is.
Example: Maria measured the thickness of the aluminum rod. |
| 9. average | The number we get when we add a group of numbers and then divided by the number of numbers.
Example: The average of 8, 10 and 15 is 11. (8 + 10 + 15 = 33; 33 ÷ 3 = 11) |
| 10. square | four straight sides and four right angles.
Example: This table has four sides and four 900 angles; it’s square. |
| 11. reading | the numbers you get from looking at a measuring instrument.
Example: The reading for the diameter was 2.017 in. |
Vocabulary Practice
WORD LIST 2
| 1. readout | the answer to a math problem, as shown on a computer screen or in the display window of a calculator.
Example: The readout in the display window said: 4.175 in. |
| 2. pitch | the distance between two threads on a screw, measured parallel to the axis.
Example: This micrometer will measure the pitch on any screw. |
| 3. “mike” (a micrometer) |
a slang word which means micrometer.
Example: Elena, hand me that 1-inch mike, please. |
| 4. to “mike” (to use a micrometer) |
to take a measurement with a micrometer.
Example: Be sure to mike all those parts before you leave, Juan. |
| 5. caliper | an instrument with two joined legs (or jaws), used to measure diameters.
Example: Telesforo checked out an outside caliper from the tool room. |
| 6. bar | a solid rod on which the moving jaw of the caliper slides.
Example: The marks and numbers of the main scale are located on the bar of a vernier caliper. |
| 7. joint | the part of a pipe system where two pipes are joined together.
Example: Check this pipe to see that it doesn’t leak at the joint. |
| 8. shoulder | a surface on a part which is farther out than the rest of the part.
Example: Bill, measure the distance from top of this down to the shoulder. |
| 9. to slope | to run down at an angle. 
Example: This hill slopes down to the river. |
| 10. reach | the distance that the threads of a screw cover, measured parallel to the axis.
Example: The reach of these threads is 2 in. |
Vocabulary Practice

Tool Names
MICROMETERS AND CALIPERS
In the last lesson, lengths were measured accurately to the nearest sixty-fourth of an inch. The decimal equivalent of 1/64 = .015625; this means that the distance between any two 64th marks is more than 1/100 of an inch—not very accurate, if the nearest .001″ or .0001″ is required. In the next two lessons some measuring instruments will be used which are much more precise and give measurements that are accurate to the nearest .001 ” or .0001 “. Calipers are in the next lesson. In this lesson, micrometers will be discussed.
1. MICROMETERS: In this picture there is an outside micrometer. Take a few minutes to look at the names of all the parts.
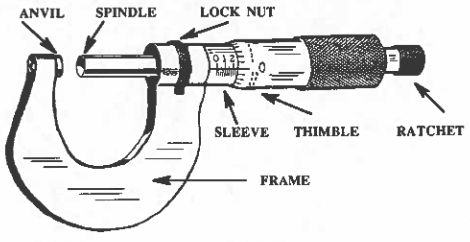 a. Outside Micrometers: The micrometer in this picture is an outside micrometer, i.e., it fits around the outside of something to be measured. The thing to be measured goes in between the anvil and the spindle. By turning the ratchet at the end of the micrometer, the spindle can be moved in or out; when the ratchet is turned, the anvil and spindle touch the outside surface of the object being measured. The ratchet is there to prevent damage to the threads inside the micrometer; when the anvil and spindle are perfectly snug around the object, the ratchet will continue to nun and click, but it won’t move the spindle any farther ahead. If a micrometer does not have a ratchet, it will be important not to tighten the micrometer too much.
There are a variety of micrometer sizes, with greater or lesser size frames, and with greater or lesser distances between the spindle and the anvil. The micro. meter used for practice in this lesson is a small one; it’s for measuring objects 1.000″ or less. An object 4.753″ long would need at least a 0-5″ micrometer.
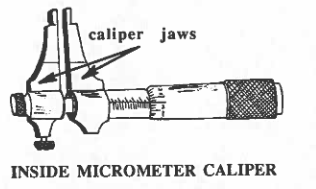 b. Inside Micrometers: Sometimes it will be necessary for the machinist to measure the inside diameters and other dimensions inside a hole in a part,
e.g., the inside diameter of a piece of pipe. One way of measuring inside a hole is to use an inside micrometer. The kind shown on our vocabulary sheet and here is an inside micrometer caliper. This micrometer has caliper jaws which open and close to fit the hole which is being measured.
Note: When measuring inside a hole, it is well to move the jaws around to make sure you are measuring the true diameter and not a chord.
c. Special Purpose Micrometers:
1) direct-reading micrometer: gives a digital readout in a display window, like on a calculator.
2) large-frame micrometer: is used for measuring large diameters (up to 60 inches) and has a set of anvils with different lengths which can be interchanged in the micrometer frame.
3) screw-thread micrometer: this will measure the pitch diameter of a thread (pitch dia. = outside dia. minus the depth of a single thread).
4) metric micrometers: these use the millimeter as the measuring unit; such micrometers are accurate to the nearest .01 mm. The line on the sleeve is divided into millimeters, with every fifth one numbered. The circumference of the thimble is divided into subdivisions of .01 mm each.
Definitions
How to Read a Micrometer: It’s time now to take out the micrometer from its case. This micrometer has a few features different from those shown in the picture:
1) Instead of a lock nut, it has a lock lever. To lock the micrometer in place, push the lever to the left; to loosen it, push the lever to the right.
2) It also has a vernier scale of numbers which allows the user to get an accurate measurement to the nearest ten-thousandth of an inch. The use of this scale will be explained in a moment.
The micrometer is read in this way:
1) Read the largest visible number from the sleeve. Each number that can be seen is worth .100 in. (i.e. 1/10 in.).
2) Count the number of sleeve marks that show past the visible number on the sleeve and multiply by .025. Each mark is worth .025 in. (25/1000 in.).
3) Count the number of marks past zero that show on the thimble. Each mark is worth .001 in. (1/1000 in.).
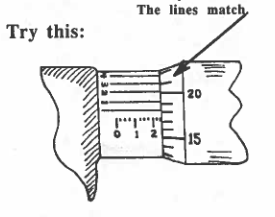
4) Find the line on the vernier scale that lines up exactly with a mark on the thimble scale. Each mark on the vernier scale is worth .0001 in. (1/10,000 in.).
5) Add the readings from steps 1 to 4. The total is the correct micrometer reading.
| STEPS | RESULTS |
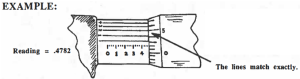
| Step 1: Read the largest visible number from the sleeve (Each number .100″): | .400″ |
| Step 2: Count the number of sleeve marks past the visible number (Each mark = .025″): 3(.025″) = | .075″ |
| Step 3: Count the number of marks past zero that show on the thimble (Each mark = .001″; use the unnumbered line on the vernier scale): | .003″ |
| Step 4: Find the line on the vernier scale that lines up exactly with a mark on the thimble. (Each vernier line =.0001″): | .0002″ |
| Step 5: Add up the results from the first four steps. The total = correct reading: | .4782″ |
Follow the steps one more time for reading the outside vernier micrometer which you have among your instruments for practice.
| Step 1: Visible sleeve number: | .200″ |
| Step 2: Number of sleeve marks: 2 (.025) = | .050″ |
| Step 3: Number of thimble marks past zero: | .018″ |
| Step 4: Line on vernier scale that lines up with thimble mark: | .0003″ |
| Step 5: Add up the results of Steps 1 to 4: | Total = .2683″ |
Practice the first three steps for reading a micrometer
Many micrometers do not have the vernier scale (which gives a reading to the nearest ten-thousandth). To read these micrometers, only the first three steps are done, and the results totaled. The pictures below show micrometers like this.
Practice reading a vernier micrometer with all four steps
VERNIER MICROMETER
Before you practice using the decimal inch outside micrometer, it will be good to first practice making readings from the micrometer using paper drawings like you just studied on the last two pages.
Print this worksheet. 5.2 Practical Vernier Mike Reading
PRACTICE DIALOGUE: Listen, then practice with a partner.
Situation: There are two people talking, a supervisor and a machinist named Isaac.
Sup: Hi, Isaac, how are you doing today?
Isaac: I’m doing fine, but I just ran into a problem: I need to check the diameter on this part, but the mike is too small.
Sup: What size dimension do you need to measure?
Isaac: I made a rough estimate with my steel rule; it’s about 18 inches.
Sup: Well, go to the tool room, and ask Carlos for one of the largeframe mikes.
Isaac: I’m on my way, but tell me again: what should I ask for?
Sup: Ask for a inch large-frame mike.
Isaac: I’ll do it. And thanks very much.
Sup: When you finish miking those parts, come and see me.
Isaac: Yes, sir. I won’t be long.
