Lesson 2: Lines
BLUEPRINT LINES
Word List
| arrowhead | the pointed end of an arrow. e.g. sometimes a line will have an arrowhead on its end. |
| dash | a short, straight line. e.g., A center line uses a dash, then a long line, then a ash, etc. |
| hidden | not able to be seen from the outside. e.g., The machinist needs to know the shape and dimensions of the part’s hidden features. |
| invisible | not able to be seen, not visible. e.g., Have you ever imagined what it would be like to be invisible? |
| jag | a sharp tooth-like shape that sticks up or down.
e.g., This line has three jags in it: Related word: jagged = having jags in its shape. |
| leader | a line used in blueprint drawing which points to something by the use of an arrowhead. e.g., Often a leader will run from a blueprint note to some feature of a part. |
| object | the part that the blueprint is picturing. e.g., There is a special line in blueprint drawing used to show the outside edges of the part.Same as “visible” line. |
| phantom | something that seems to appear to the sight, but is not really there. e.g., A phantom line shows a second position where something will be when it moves. |
| section | a part of something; the inside of a thing which is seen by cutting straight through the thing (cross section). e.g., Sometimes the machinist needs to see a cross section of a part.Related Word: sectional view: a view of the inside of a part made when a plane cuts through the part. |
| to alternate | to take turns doing something, first one, then the other. e.g., The center line alternates dashes with long lines: first a dash, then a long line, etc. |
| to connect | to join two things. e.g., In this exercise, you should connect the two parts by drawing a line between them. |
| to note | to take notice of something; to look at carefully. e.g., You will note how this part has four holes, not five.Related word: note e.g., A blueprint note tells the machinist what to do or gives other information. |
| to spoil | to make a mistake so a part is not acceptable or usable. e.g., Ramon was not careful and spoiled one of the parts. |
| uniform | being or looking the same in all parts. e.g., A piece of round stock has a uniform shape from one end to the other. |
| wavy | wavy having uneven edges like a wave. e.g., This is an example of a wavy line |
| weight (of a line) |
the thickness of a line in blueprint drawing. e.g., The weight of a line can be thick, medium, or thin. |
Ex. 6.2 Practice New Vocabulary.
BLUEPRINT LINES
In order for machinists to visualize the part accurately, they must know the different kinds of lines that are used in the drawings. There are ten different kinds of lines, and each kind has a special use and meaning. We want to look at these lines, learn their uses, and know their names. When we draw the lines, each line will have a weight, i.e., it will be either thick, medium, or thin. Here are the first three lines:
1. VISIBLE LINE or OBJECT LINE: This line is used to show the outside shape of the part; the line is called “visible” because we can see it when we look at the outside of the part; the line can be called an “object line” because it shows us the edges of the object, the part itself. Visible lines are thick and unbroken or continuous (not broken).

2. HIDDEN LINE: This line is used to show the inside edges of the part which can not be seen from the outside. It is useful to help us visualize the size and location of a hole inside the part. Holes like this are “hidden” or “invisible” (not able to be seen). Hidden lines are of medium thick- ness and are made of short dashes (very short lines in a row).
 3. CENTER LINE: This line goes through the center of some part of the part; it is important to know where the centers are, in order to know where to drill holes and make cuts; a part can be spoiled, if the holes are not drilled correctly. Center lines are thin lines that are made of long lines alternating with short dashes: long line–dash–long line–dash, etc.
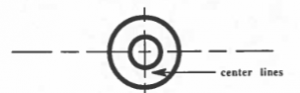
Where two center lines cross, is the center: that is the point at which drilling would be done.
Ex. 6.2 First three lines
MORE (blue)PRINT LINES
We have studied these blueprint lines:
(1) visible or object lines,
(2) hidden lines, and
(3) center lines.
Let us learn about more print lines.
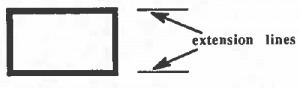
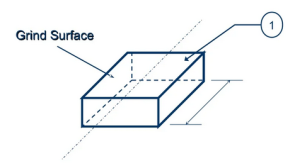
4. EXTENSION LINES: These lines are drawn outside the edges of the drawing and show the continuation or extension of important lines in the drawing. They are usually drawn out farther so that the dimensions of some of the part’s features can be shown. The extension lines are thin and unbroken. The extension lines do not touch the object lines.
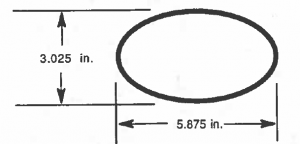
5. DIMENSION LINES: These lines show the length of important dimensions of the part. They run parallel to the dimension you wish to show. They tell the lengths of the part’s parts by giving a number which indicates the number of inches and fractions of an inch for each length. A dimension line is a thin line with arrowheads at both ends of the line. The line is broken in the middle and the numbers of the dimension are inserted (put) between the two pieces.
6. LEADERS: These lines point to different areas of the drawing and show what blueprint notes go with those areas. Leaders are thin lines. 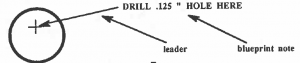
Notice that a leader line can be straight with an arrow or it can be bent with an arrow as seen in 1 in the picture below.
Ex. 6.2 Second three lines
OTHER BLUEPRINT LINES
We have studied these blueprint lines:
(1) visible or object lines,
(2) hidden lines,
(3) center lines,
(4) extension lines,
(5) dimension lines, and
(6) leaders.
Let us continue to learn some other blueprint lines.
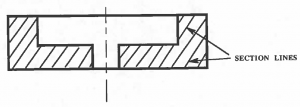
7. SECTION LINES: These lines show where a part has been cut through to show a cross section. They are thin lines, usually drawn at a 45° angle to a horizontal line. Another way to say “cross section” is “a sectional view” of a part.
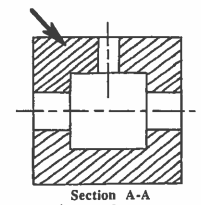
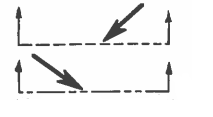
8. CUTTING PLANE LINE or VIEWING PLANE LINE:
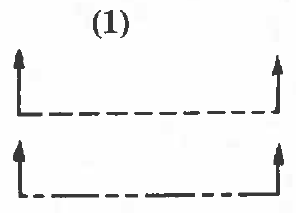
(1) to the right, we see the two acceptable ways to make a cutting plane line or viewing plane line. It is a thick, broken line with two short lines at right angles and with arrow- heads.
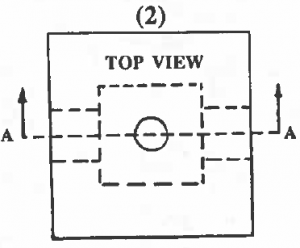
(2) On the left, we are looking at the top of the part. The cutting plane line is shown cutting through the part at a place where we need to see what the inside of the part looks like; the arrowheads show the direction in which we are looking.

(3) The picture on the right shows us the cross section of the part where our line cut through; we are “inside” the part.
Note the two A’s that mark the arrowheads and the A-A used to identify the section.
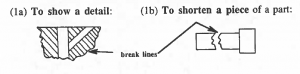
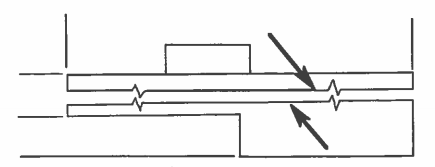
9. BREAK LINES:
In drawing blueprints, we can use three different kinds of break lines:
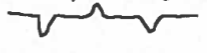
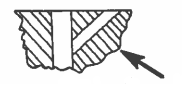
(1) A short break uses thick, wavy lines. They are used to:
(a) Show some detail of a larger print.
(b) Shorten a piece of a part that is uniform throughout its length.
(2) A long break uses thin lines which have jags in them:
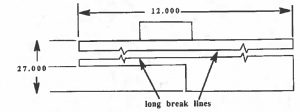
(Making the break saves space on the paper. Without the break, the complete drawing would require a left side of27 units.)
(3) A round stock break uses two thick lines shaped like an “S”.
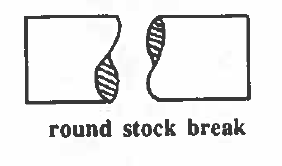
(The S-break for round stock is used to shorten a piece with uniform shape throughout its length; it uses thick lines.)
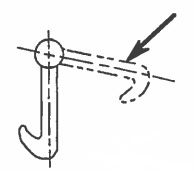
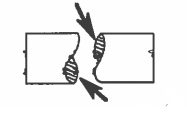
10. PHANTOM LINE:
When we want to show a second position of some part, we use phantom lines which outline the part in the new position. Phantom lines are thin lines made up of one long line alternating with two short lines.
second position
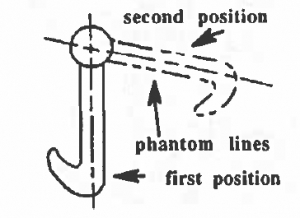
(The hook is shown with object lines in its first position.
Phantom lines are used to show the same hook in its second position,
when it swings out to the right.)
Ex. 6.2 Last four lines
Exercise 1: Look at the picture, then (1) write down the name of the kind of line, and (2) circle one of the three weights for that line. The arrow () points to the line.
|
THICK MEDIUMTHIN |
THICK MEDIUMTHIN |
|
THICK MEDIUMTHIN |
THICK MEDIUMTHIN |
|
THICK MEDIUMTHIN |
|
 1. .
1. . 2. .
2. . 3. .
3. . 4. .
4. . 5. .
5. .OTHER BLUPRINT LINES
|
6. . THICK MEDIUM THIN |
7. . THICK MEDIUMTHIN |
|
8. . THICK MEDIUMTHIN |
|

Ex. 6.2 Open Ended Questions
Informal Speech
Note: Sometimes it is difficult for non-native speakers to understand words that people in the United States say. One reason might be that the native speakers are pronouncing the words with an informal pronunciation by running the words together and sometimes even changing the sound. For example, “I want to” comes out sounding like “I wanna.”
Here is a list of some words and phrases that get changed in this way. We will practice them first, and then use them in the conversation. The words will all be spelled correctly. Look at the words, listen to how they are pronounced in “informal speech”, and then practice saying them that way. (The parts that change are underlined. Listen carefully.)
- to the store
- I have to
- I’ve got to
- I don’t know
- I don’t care
- You can do it
- Let me
- Look at
- Do you like pizza?
- Do you want to go to the movies?
Practice Conversation:
Situation: Ramon and Bill are talking in the shop.
R: Bill, come over here to the table. I want to show you some things about drawing blueprints.
B: Yeah, Ramon, let me have a second, and I’ll be right there.
R: Okay, now let’s look at these lines. Here’s an object line that shows the edges of the part. It uses a thick line.
B: I already know that one, but I don’t know what these are.
R: Those are hidden lines. They show a part’s inside edges that can’t be seen from the outside.
B: I’d like to stay and learn more, but I’ve got to go to the office and see the supervisor. Do you want to go to lunch in a while? I’d like to.
