Lesson 4 Lathe Cutting Tools
Review:
Another word for a lathe cutting tool is toolbit. We will want to learn the names of the important parts of a toolbit. We will see three views of the toolbit, as we saw in the module on blueprints.
CUTTING TOOLS
Ex. 7.4.a
Ex. 7.4.b
LATHE CUTTING TOOLS
The cutting tools used on a lathe are usually called toolbits. For any cutting tool to be able to cut something else, it must be harder than the thing it is cutting. There are many hard materials used to make toolbits, but the most common materials found in schools is high speed steel, an alloy of iron which can contain several chemicals such as tungsten, chromium, or cobalt to give it strength and hardness.
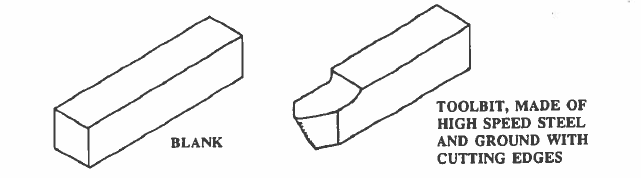
When you go to the machine shop, you will buy a piece of high-speed steel known as blank. It is not cutting tool yet, because it needs to be ground on a grinding wheel to make the correct cutting edges on it. Below, the first picture shows a blank, a piece of high-speed steel, as you would buy it. The second picture shows a piece of high-speed steel that has been ground correctly by a machinist to make a useful cutting tool.
You will learn in the machine shop how to correctly grind your own toolbits. There are many possible shapes that a toolbit might have, depending on the purpose. For now, you will learn the shape of a general purpose toolbit which can be used in a wide variety of situations. Our job in VESL is to learn the words that are used to talk about toolbits.
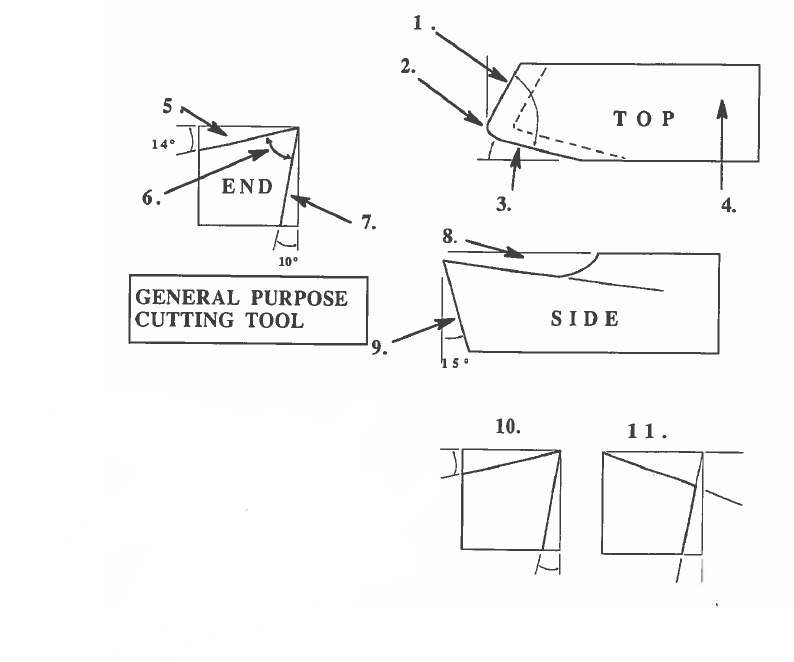
Below are three views of a general purpose toolbit and explanations of the important words connected with it.
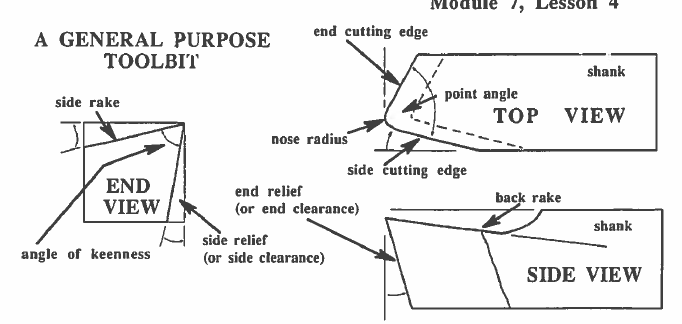
When the toolbit has been ground, there will be two cutting edges: (1) a side cutting edge at the front side of the toolbit, and (2) an end cutting edge at the end of the toolbit; the angles of those two cutting edges is best seen in the top view; two cutting edges should form a point angle of less than 90o (between 70o and 80o is good). The point, made by the point angle, is not left pointed; it is rounded by grinding a nose radius of whatever size; this prevents the point from being broken off and lessening the toolbits cutting efficiency.
The two cutting edges will not be able to do their job unless they are given some relief (also known as clearance). Relief is grinding an angle back from the cutting edge, so the side and end of the tool are perfectly clear of the work and will not bind the cutting. Side relief (or side clearance) tapers away from the side cutting edge; end relief (or end clearance) tapers away from the end cutting edge.

The toolbit is also ground with two rakes. A rake is used to change the angle of a cutting edge and is always cut into the top surface of the toolbit. There are two kinds of rakes: a back rake is used to change the angle of the end cutting edge; a side rake is used to change the angle of the side cutting edge.
The angle formed by the side rake and the side clearance is called the angle of keenness. It can vary to be greater than, or less than, 90o.
Another way to classify rakes is by whether the angle of keenness is greater or lesser than 90o. If grinding a rake onto a toolbit makes the angle of keenness less than 90o, the rake is known as a positive rake. If grinding a rake onto a toolbit makes the angle of keenness greater than 90o, the rake is known as a negative rake.
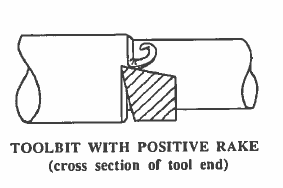
The cutting edge created by a positive rake angle is usually the best for many cutting jobs. A toolbit with a positive rake cuts smoothly through the metal with less friction and heat. The chips come out evenly and with less effort. The angle is sharper and more efficient.
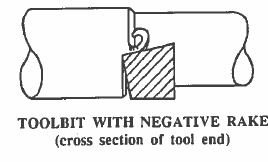 The negative rake angle gives a stronger edge for cutting tough metal or abrasive material. The extra strength is gained, but extra friction and heat is generated at the same time.
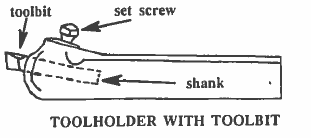
The end of the toolbit which is not ground is called the shank. The shank fits into the toolholder and is held tightly there with a set screw. The tool holder, in turn, is fit into the toolpost and is held there with another set screw.
 Cutting fluid: The tool-chip interface is the place where the tool digs into the workpiece to cut out a chip; this location becomes very hot because of the friction. To cool and lubricate this cutting area cutting fluid (sometimes called coolant) is used. It is sprayed directly onto the tool-chip interface. There are many good cutting fluids, including oil, water-soluble oil, and chemicals which can be mixed with water. They will make the toolbit last longer.
Ex. 7.4 Toolbit Matching
Exercise 7.4 ???
Can you follow directions?
- Drag the circle around the picture of the steel blank.
- Drag the box around the isometric drawing of the finished toolbit.
- Drag an arrow which points to the radius nose in the top view of the toolbit.
- Drag another arrow which points to the side rake angle, as shown in the end view of the toolbit.
- Label the three views correctly with the words.
Ex. 7.4.?
CUTTING TOOLS
Ex. 7.4.?
CUTTING TOOLS
Exercise 3: Look at the pictures and fill in the blanks with missing letters.
|
7. s d . e i f |
|
|
|
|
|
|
|
|
|
|
Ex. 7.4.???
ANOTHER CONVERSATION ABOUT SAFETY
Alejandro and Isidro are talking again about their favorite topic: safety. Let’s listen to them.
|
A: |
I want to tell you a few other things about lathe safety, Isidro. |
|
|
I: |
Go ahead, Alejandro. I’d like to hear more. |
|
|
A: |
Frequently you will need to measure the workpiece, to check the diameters, or the length, of some other feature. When you do that, be sure to turn off the machine first. |
|
|
I: |
That sound like good advice. What you’re saying is to keep my hands, my shirt sleeves, my clothes, and my hair away from the lathe when it’s running. Then when I need to check the workpiece, I should turn off the lathe. |
|
|
A: |
Exactly! And another thing; if you’re filing or polishing a workpiece, or doing anything that doesn’t use the toolbit, be sure to loosen the set screw and remove the toolbit from the tool holder, because it could cut you. |
|
|
I: |
I’ll remember what you’ve told me today, Alejandro. Thanks |
|