Lesson 6 Lathe Operations
LATHE OPERATIONS
In this lesson of Module 7, we are going to see some of the many things that a lathe can do. Each of these jobs that the lathe can do is called an operation. You will see that the lathe is veery versatile – that means it can do many different things, and do them well.
Take a minute now to look ahead through the pages of this lesson. Write down, on this page, the names of the operations – they all have a number in front of them and end in -ING.
LATHE OPERATIONS
| to turn |
to reduce the outside diameter of round work, held in a chuck or between centers, by removing material. E.g., The toolbit removes material from the O.D. during turning. |
| rough cut |
the first cutting action of a lathe as it quickly removes extra material from the O.D.. E.g., Marco used a feed of .010 inches while making his rough cut on the workpiece. |
| finishing cut |
the second cutting action of a lathe which produces the exact diameter and a good surface on the part. E.g., He used a feed of .003 inches during his finishing cut. |
| to face |
to cut the workpiece to its required length by removing material from the end(s). E.g., Julio faced the end of the workpiece; then he polished it with an abrasive cloth. |
| to fillet |
|
| to bevel |
to cut a surface at an angle to some other surface (angle not = to 90o). |
| appearance |
how something looks when you first see it. |
| nervous |
fearful, showing anxiety. e.g., Ming gets nervous when she drives home at the rush hour. |
| to recess |
to cut a groove into a workpiece so that it is deeper into the work. e.g., Larry, I suggest you recess that groove about .250th of an inch. |
| gradual |
little by little, at a small angle to the axis. e.g., The taper on the workpiece was very gradual |
| steep |
at a greater angle to the axis. e.g., Muhammed’s car was not able to go up the steep hill. |
| boring bar |
|
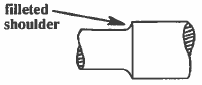 to cut a rounded band with a certain radius around a piece of work. e.g., Chin, you did a very good job in making this filleted shoulder.
 a tool which the machinist uses to bore a hole.
ExerciEx. 7.6 Copy New Vocabulary
LATHE OPERATIONS
Lathe operations are the various cutting, shaping, and finishing activities that can be done on the lathe. Using its various accessories, the lathe is capable of a wide variety of operations. Here are some of the common ones:
1. Turning: To turn is to remove material from the O.D. (outside diameter) of a round workpiece, by feeding a cutting tool into the work. The purpose of turning is to reduce the O.D. of the work. The work can be mounted between centers or in the chuck.
|
NOTE: |
Turning and other operations on the lathe are usually done from the tailstock toward the headstock, from right to left. The pressure of the toolbit cutting into the material is better supported by the headstock than by the tailstock. |
When turning a workpiece, the machinist should try to make only two cute: (1) a rough cut, which is to remove extra material quickly, and (2) a finishing cut, which is to produce a diameter to the correct size (within the tolerance) and to make a good surface.
For the finishing cut, a fine feed will allow better control and more accuracy for completing the part. A feed of 0.010 to 0.015 inches is used for rough cuts; a feed of 0.003 to 0.005 inches is used for finish cuts, depending on the material used.
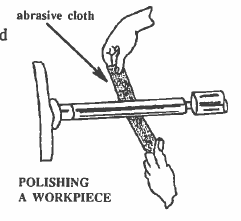 2. Filling and Polishing: To put a good finish on the workpiece, the machinist will sometimes file or polish the work in a lathe. A file may be held against the rotating work to remove small amount of material or burrs. A workpiece may be given a polished finish by holding an abrasive cloth next to the rotating work. Don’t let the end of the abrasive cloth get near the work; it can get caught, and the cloth can be pulled from your hand.
3. Facing: Usually a piece of rough stock is cut longer than what is actually required for the part. At some point in the machining process, it is necessary to cut the workpiece to the correct length. End facing is the proces
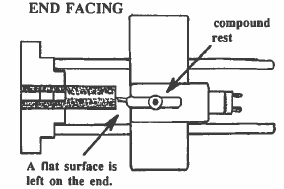 s of removing the extra material from the end and leaving the flat surface on the end, at a 90o angle to the axis of the workpiece. This procedure can be done between centers or in a chuck. If the center holes are to be removed later, the piece should be left ¾ inch longer.
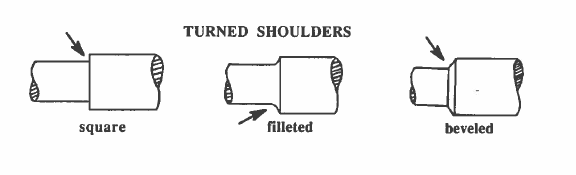
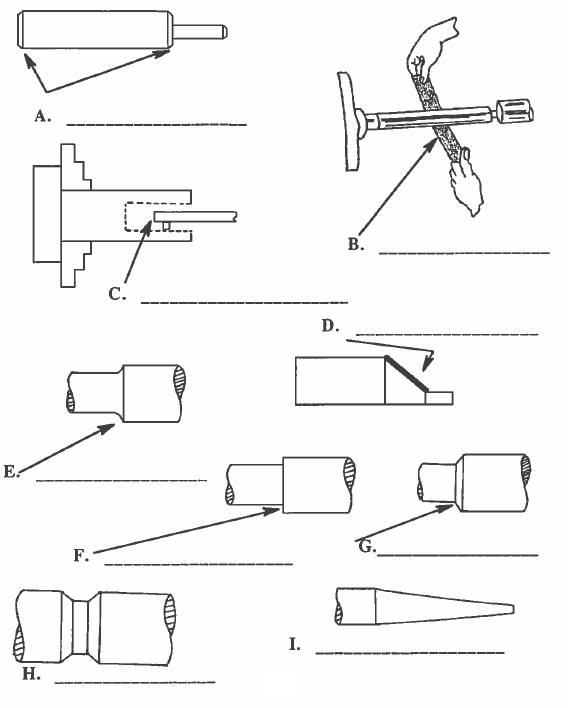
4. Turning a Shoulder: Sometimes more than one diameter is required on the same part. At the point where a different diameter starts, a shoulder is cut. There are three kinds of shoulders: (1) square shoulder (a step at 90o to the longitudinal axis of the work), (2) filleted shoulder (a rounded shoulder cut to a certain radius), and (3) beveled shoulder (cut at angle to the axis within the range of 30o to 60o, usually at 45o).
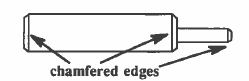
5. Chamfering: To cut off or bevel any sharp edge, especially at 45o angle. This could be at the end of a workpiece which has been faced. It could also be done to the edges of a square shoulder, especially when the depth of the step is great. This process improves the appearance of the part and helps to eliminate sharp edges which can be dangerous, and which make people nervous.
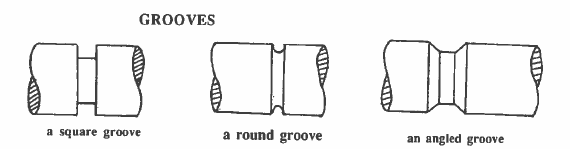
6. Grooving (also called recessing): Sometimes a groove is needed around the diameter of the work. The shape of the groove can be square, round, or angled. To make a groove, the machinist grinds a toolbit to the shape ad size of the groove that he/she wants. Here are some grooves.
7. Taper Turning: A taper is a gradual change in the diameter of a workpiece. Some tapers are steep, and some are very gradual, as shown below. A taper can be cut between centers, in a chuck, or in a collet.

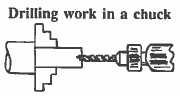
8. Drilling, Boring, and Reaming: To drill a hole in the faced end of a workpiece, a drill can be mounted in the tailstock spindle. A lathe dog can be used to keep the drill bit from turning. It is the workpiece which will provide the cutting movement as it spins against the stationary drill bit.
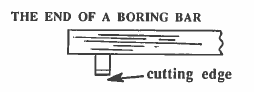 Boring tools can be used to enlarge a drilled hole and to cut inside diameters. A boring bar (a tool used for boring) can be mounted in the tool-post on top of the compound rest. The compound rest is moved to a position in which it points to the center of the work held in a chuck.
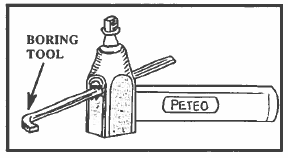
Here is a picture of the boring bar being used to bore a hole in the end of a piece of round stock. Below is a picture of a lighter boring tool used for smaller boring jobs.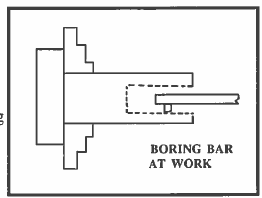
A reamer is used to give the final accurate dimensions to the internal diameters.
Ex. 7.6 Matching Operations
LATHE OPERATIONS
|
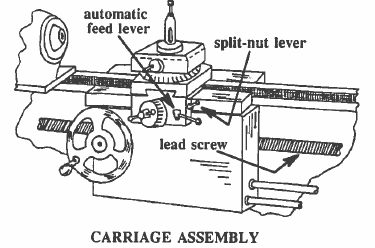
split-nut lever |
a part of the lathe which engages with the lead screw to move the toolbit at an even rate during thread cutting. e.g., While the split-nut lever is operating, the automatic feed lever must be disengaged.
|
| grip |
the part of a tool or a gun where the hand holds it. |
| to part |
to cut through something so that a piece comes off. |
| to cut off |
to part, to cut through something so that a piece comes off. |
| pattern |
a design which is repeated many times across a surface. |
| roll |
a cylinder-shaped part of a tool which is rolled across something else. |
Ex. 7.6 New vocabulary practice
LATHE OPERATIONS (Continued)
9. Threading: Often a workpiece will need to be threaded, either externally, or internally, or both. T
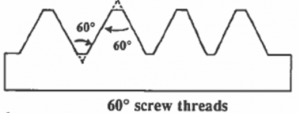 o cut an external thread, a toolbit with a 60 degree point angle is fed into the rotating work to form the usual 60o thread. The carriage is advanced along the length of the work when the split-nut lever is engaged; this lever sticks out from the lathe apron.
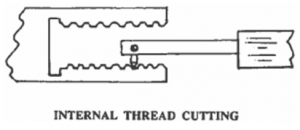 To cut an internal thread, taps are usually used (Cf. Mod 3, Les 5), but they can also be cut on a lathe, using a tool much like a boring toolbit. The threads would be cut into the sides of a hole which has been driller or bored already. (Cf. Mod 5, Les 3; for a review of a picture of the parts of a thread and a list of the terms used when speaking of threads).
10. Cutting off (Also called parting): A longer, thinner toolbit, called a cutoff tool, is used when the ma
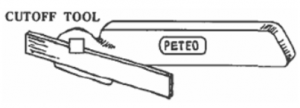 chinist wants to cut off a workpiece wants to cut off a workpiece that extends out from a chuck. The cutoff tool will be mounted in the toolpost.
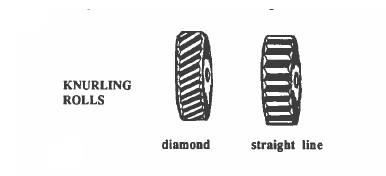
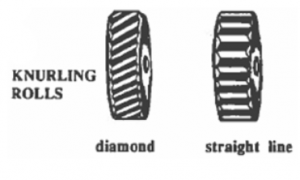 11. Knurling: Knurling is a process which gives the finish of a part a pattern of diamonds of straight lines; this is done to improve the appearance of the part or to provide a gripping surface, e.g., the handle of a tool which should not slip in the hand.
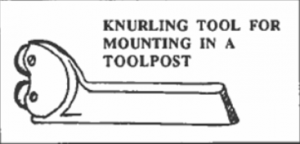
The diamond or straight-line pattern is cut into a workpiece by mounting a knurling tool with knurling rolls into a toolpost. The knurling tool is then fed into the rotating work; the rolls are turned by the spinning work, and, as the pressure is increased the pattern is cut into the work.

There are many other operations in addition to these we have studied. Your machine shop teacher will show you how to do all these things correctly.
Right now you need to practice the language of operations, so you can ask good questions and understand what is said.
It will finally be your great pleasure to hold in your hand a beautiful, finished part which you have made.
7.6 Identify Lathe Operation Tools
Practice Conversation:
Situation: Samuel, an experienced machinist, is helping Rashid, a new lathe operator.
Conversation No. 1:
|
Rashid: |
I have a blueprint here, but I’m not sure I understand all the procedures. |
|
Samuel: |
Well, let me look at it. You mount the workpiece between centers. I see you’ve already done that. Did you test the work for concentricity? |
|
Rashid: |
Concentricity? What do you mean? |
|
Samuel: |
A workpiece is concentric when it is perfectly centered. All points on the circumference of the work are an equal distance from its axis. You can use a dial indicator to test that. |
Conversation No. 2:
|
Samuel: |
Now the print says you want a diameter of 4.750 inches at the right, a shoulder 2.500 inches from the end, dropping down to 4.500 inches at the narrower part. |
|
Rashid: |
What O.D.’s am I going to want for my rough cuts? |
|
Samuel: |
Well I’d leave maybe 0.010 extra. So…let’s see…you’d want 4.760 at the end and 4.510 after the shoulder. |
|
Rashid: |
And what about the shoulder? It’s beveled. What angle should I put on it? |
|
Samuel: |
Let’s see. Yes, the blueprint calls for 45o. That’ll be good. |
|
Rashid: |
Thanks a lot, man. I really appreciate your help. |
