Lesson 4: Other Measuring Instruments
Instrument Names
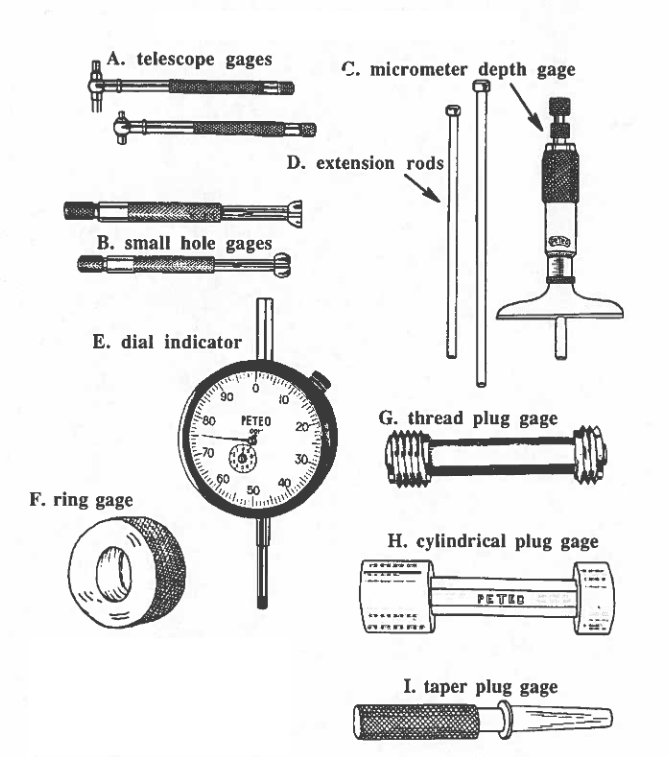
Look at the pictures.
Look at the pictures.
Look at the pictures.
Look at the pictures
WORD LIST
| 1. gage (or gauge) | something made to measure the size, capacity, dimension etc. of parts. e.g., Telesforo used a thread plug gage to check the tolerances. |
| 2. indirect measurement | Some gages are measured with a micrometer after they are pulled out of a narrow place. e.g., A telescope gage gives indirect measurements. |
| 3. spring-loaded | a part that has a spring which will push the part back to it original position. e.g., The arms of the telescope gage are spring-loaded to touch the sides of a hole. |
| 4. knob | a small round handle. e.g., The micrometer has a knurled knob for turning the thimble. |
| 5. slightly | by a small amount. e.g., The hole into which a bolt goes must be slightly larger than the bolt. |
| 6. to transfer | to carry from one place to another. e.g., The telescope gage is transferred from inside a hole to inside a micrometer. |
| 7. fixed | with no moving part, without any variation in size. e.g. A cylindrical plug gage is a fixed gage–it always gives only one measurement. |
| 8. inside diameter (I.D.) | 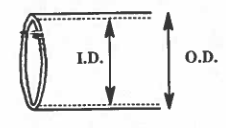
the diameter inside a cylinder. |
| 9. outside diameter (O.D.) | the diameter outside a cylinder. e.g., An outside micrometer is good for measuring the outside diameter of a pipe. |
| 10. to wobble | to move from side to side. e.g., When you insert a gage in a hole it should not wobble. |
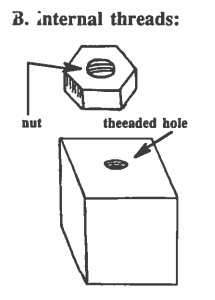
| 11. internal threads | the grooves that are cut on the inside of a cylinder. e.g., The internal threads of a threaded hole will receive the external threads of a bolt. |
| 12. external threads | the grooves that are cut on the outside of any cylinder. e.g., Pablo cut external threads on the end of the steel shaft. |
| 13. burr | a rough edge left on a piece of metal by cutting or drilling. e.g., Always remove the burrs from your work after you have cut or drilled metal. |
| 14. blind hole | a hole drilled into metal which does not go all the way through. e.g., Sometimes we want to measure the depth of a blind hole. |
| 15. blade | the long flat part of a knife, screw driver or other tool. e.g., The screw pitch gage has blades which come out for measuring the threads per inch. |
| 16. to retract | to be able to move out of a space and then to be pulled back into that space. e.g., The screw pitch gage has blades which are retracted when they are not in use. |
Vocabulary Practice
OTHER MEASURING INSTRUMENTS
The micrometer and calipers which we studied in the last lesson (Mod 5, Les 2), give us a direct reading, i.e., w: can read the number of a size directly from things like scales or dials with arrows. There are also instruments which give us an indirect measurement. Perhaps the best way to understand this is with some examples.:
1. Telescope gages: These gages are shaped like a “T”; the two arms of the T are pushed out to the 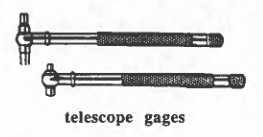 sides by springs inside (these arms are said to be “spring-loaded”.) These arms can be pushed in and then tightened in any position by turning a knurled knob at the bottom of the T. A telescope gage is useful for measuring the size of a hole or slot that is difficult or telescope gages impossible to
 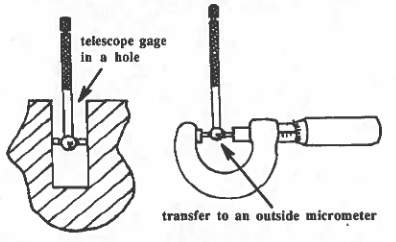 reach with a direct-measurement instrument. Because telescope gages come in different sizes, the machinist can pick one that is slightly larger than the hole he/she wishes to measure, press in the arms, insert the gage in the hole, let the arms touch the sides of the hole, tighten the knurled knob, remove the gage and measure the length of the arms with an outside micrometer or a dial caliper.
2. Small-hole gages: These gages are also to measure holes and slots, but they are smaller than the telescope cages, and fit into very small places. At one end they have a flattened ball which is divided into two halves. Turning a knurled knob at the other end will move the two halves of the ball together or allow them to move apart.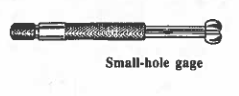
When measuring a hole, they are allowed to touch the inside sides, the knurled knob is tightened, the gage is removed, and the ball is measured with an outside micrometer or caliper. Small-hole gages come in sizes from 1/8 ” to 1/2″.
The telescope gage and the small-hole gage are examples of measuring instruments which produce a length that is then transferred to a direct-reading instrument like a micrometer or a caliper. That is indirect measurement.
There are other tools which do not adjust with knobs and do not have a dial or scale from which to read a number. Each of these tools measures a fixed size which does not change. Here are some examples.
3. The cylindrical plug gage: This gage comes in a variety of fixed sizes and can be used to test 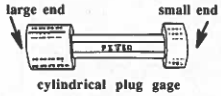 whether holes are within tolerance. The large end of large end small end the gage will not go into the hole unless the hole is larger than the outer limit of the tolerance; if the large end goes into the hole, the hole is too big. The smaller end will not go into holes that are cylindrical plug gage smaller than the lower limit of the tolerance Such a tool is useful as a quick test to see if a hole has been made within tolerance.
For example: I want to check a hole that has a diameter of 2.000 in. ± 0.001. I use a plug gage with that basic dimension and tolerance.
 The large end will be 2.001 in. and the small end will be 1.999 in.
How to check the hole:
(1) If the large end goes into the hole, the hole is too big.
(2) If the small end does not go into the hole, the hole is too small.
A plug gage might be used by a quality control inspector who could check the dimensions of many holes very quickly with the two ends of the gage.
Comprehension Questions
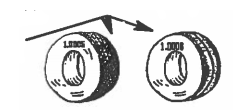
4. Ring gages: The ring gages are another example of a fixed-gage, i.e. a gauge of one size which is 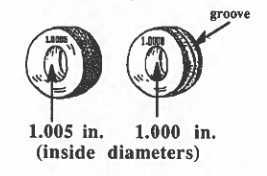 used for a quick and accurate check of an important dimension.
Here the measure is done with two rings to check if a piece of round work has a dimension within tolerance. In our example, we wish to check and see that the diameter of a piece of round work is:
1.0025 in. ± .0025. , i.e., between 1.00 in.and 1.005 in.
One ring has an inside diameter of 1.005 in.; if the piece will not fit into this gauge, it is too large. The other ring has an inside diameter of 1.000 in.; if the piece goes into this hole, it will too small. Both gages have a knurled outer edge. The ring gage with the smaller diameter can be identified by the groove which circles the middle on the outside of the gage.
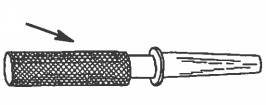
5. Taper gages: (For the definition of taper, look again at Mod 3, Les 9, List C, Word # 11)
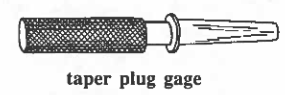 Taper gages can be either plug gages, as shown in the picture, or ring gages. They are used to measure if a taper is done correctly. They are inserted into a tapered hole or put around a tapered workpiece. If the plug or the ring wobble, the taper is not correct.
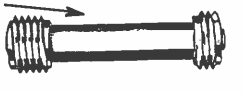
6. Thread gages: Thread gages are used for a quick check to see if internal and external threads are of the 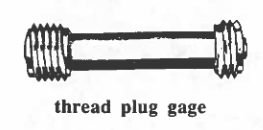 correct size. External threads are the grooves cut into the sides of round parts like bolts, screw, studs, or threaded pipes; the threads are on the outside of the work. Internal threads are the grooves cut into the sides of holes on the inside. Parts with external threads are meant to fit into parts with internal threads. The next page shows some parts that use external and internal threads.
(Remember, you can spell the word GAGE or GAUGE.)
Some threaded parts:
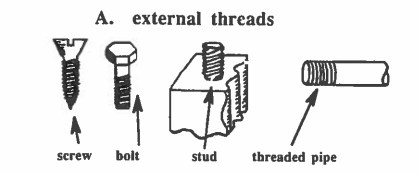
The thread gauges could be used to measure the size of any of these threaded parts. When using a thread gauge, make sure that threads are free from burrs, chips, and dirt. The gauges should also be lightly oiled so that they will turn more easily when being used on, or in, these parts.
In the threaded hole, above at the right, if the hole does not go all the way through, but ends part way down, it is called a blind hole.
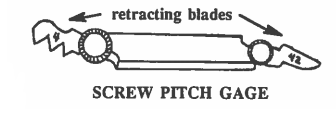 7. Screw pitch gage:
The next tool is a screw pitch gage. It is used to measure the number of threads per inch; those numbers are stamped on each blade; e.g., when the blade says “4”, that means that in one inch of threaded space on the screw or bolt or stud, there will be 4 threads.
The screw pitch gage has blades that retract (they can be pulled out from the case and can be pushed back in). To use them, the knurled screws are loosened and the blades are pulled out and tried until there is a perfect fit. With practice you will be able to find the right blade more quickly.
LET’S CHECK AND SEE WHAT YOU HAVE LEARNED:
|
1. |
|
a. used to measure the correctness of a taper inside a tapered hole. |
|
2. |
|
b. used to measure the number of threads per inch on a part with external threads. |
|
3. |
|
c. used to check if the diameter of a cylinder is within the allowed tolerance. |
|
4. |
|
d. used to check if the internal threads of threaded hole are within tolerance. |
Look at the table above.
WORD LIST B
| 1. ridge | any raised line or raised narrow strip, the long narrow top of something. e.g. The place where the two sides of the roof meet is called the ridge. |
| 2. helix | a shape which circles around a central axis in the form of a cylinder or cone. e.g. The threads on a bolt or screw are in the shape of a helix. |
| 3. mating parts | Two parts in which one part (the male part) fits into the other (the female part). e.g. A bolt (the male part) and a nut (the female part) are mating parts. |
| 4. to swing out | to turn in an arc on a fixed point. e.g., The door swung out on its hinges. ( Parts: swing, swung, swung) |
| 5. to store | to keep for later use. e.g., Carlos stored the meat in his refrigerator until Sunday’s dinner. |
| 6. to extend | to make something longer or larger. e.g., When you paint your house, a ladder helps to extend your reach. |
| 7. recess | a hollow place in a surface, a place that slopes back in from the surface. e.g., It is more difficult to measure a recess than it is to measure a surface. |
| 8. extension | a part that helps makes a tool longer. e.g., Blanca used an extension to increase the length of the depth gage. |
| 9. comparator | any measuring instrument which compares the thing you measure with a known standard. e.g., A dial indicator is an example of a comparator. |
| 10. comparison | measuring something to see if it is longer or larger than something else. e.g., When we made a comparison, we found that Alberto was 4 inches taller than Margarita. |
| 11. master | a master part is is used as a standard for comparison with parts that are made. e.g., Manuel compared the part with the master. |
| 12. revolution | one complete turn in an arc of 3600 . e.g., The abbreviation RPM stands for “revolutions per minute.” |
Vocabulary Practice
This is good time to learn some of the words that machinists use to talk about threaded parts. Every machinist should be able to make threaded parts. The first step is to learn the vocabulary:
VOCABULARY:
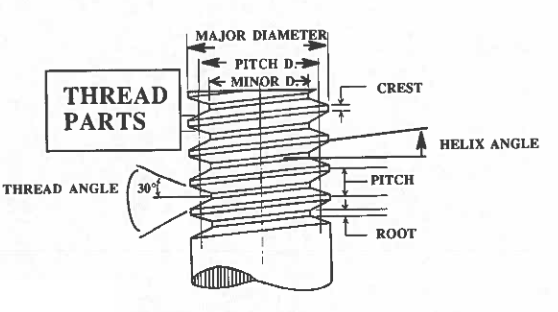
a. A screw thread is a ridge of the same size which is cut into the surface of a part in a gradually sloping direction (the shape of the thread is that of a helix).
b. The major diameter is the largest diameter of an external or internal thread.
c. The minor diameter is the smallest diameter of an external or internal thread.
d. The pitch diameter is the diameter half-way between the major diameter and the minor diameter.
e. The pitch: is the distance from one thread to the next thread, when measuring parallel to the axis.
f. The helix angle: angle made by thread and line perpendicular to the axis line.
g. The crest: is the top surface joining the two sides of a thread.
h. The root: is the bottom surface joining the sides of two neighboring threads.
i. Fit: is how two mating parts go together, i.e., how much clearance there is between the two.
j. Allowance: is the designed difference in the size between the two parts; to find the allowance we subtract the pitch diameter of the internal thread from the pitch diameter of the external thread.
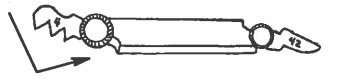
8. Radius gage: this tool is used to measure the radii of different size holes 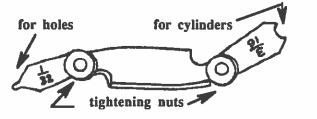 and small cylinders. The machinist tries the blades of the radius gage until he/she find one blade that fits exactly into the hold or around the cylinder. Then the machinist can read the radius from the number stamped on the blade. That number you will remember, if half the diameter.
To use the radius gage, untighten the tightening nut; then the blades will swing out freely, so you can find the one that fits. When you store the gage or want to hold the other blades out of the way, retighten the nuts.
LET’S PRACTICE WITH THE RADIUS GAGE:
(Check out the radius gage and the radio jack from your teacher).
 Use the radius gage to find the radii of points A, B, C, and D on the radio jack. Use the round blade to go into hole at E.
A = in. B = in.
C = in. D = in. E = in.
9. Micrometer depth gauge: We have already seen how the depth gauge blade on a dial caliper 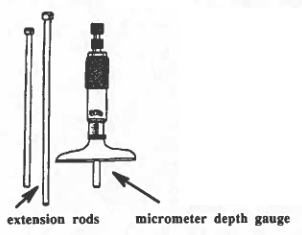 can be used to measure the depth of a hole. The micrometer depth gauge can also be used for this.
The gauge has a flat base attached to a micrometer sleeve. A rod extends down from the base; it can be changed with rods of various lengths. The gauge is good for measuring the depth of blind holes, slots, recesses and other hard-to-get-to places.
To use the gauge, insert the rod into the hole or slot, using an extension rod of about the right length. Then turn the thimble until the tip of the rod touches the bottom of the hole or slot.
10. Dial indicator: A dial indicator is an example of a class of instruments called comparators. A 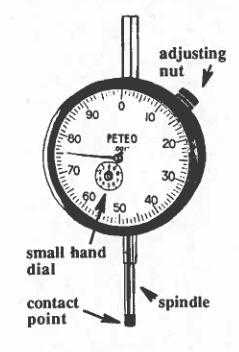 comparator does comparison measurement; it compares the size of a part to a known standard or to an original part which is exactly right; this correct part is sometimes called a master.
Any comparator will tell the machinist how much the dimensions of the part vary from the original part. These variations are shown by an arrow pointing to numbers on a dial, as with the dial indicator.
The dial indicator could also be used to help lay out certain points at the correct height, e.g. a line of holes to be drilled in a workpiece at a certain height.
The dial indicator shown in this picture is known as a continuous reading dial indicator, because it has a small hand that tell how many revolutions the large hand has made. The adjusting nut on the side allows the machinist to return the arrow to zero before measurements are made.
LET’S CHECK AND SEE WHAT YOU’VE LEARNED:
HOW WELL YOU UNDERSTAND
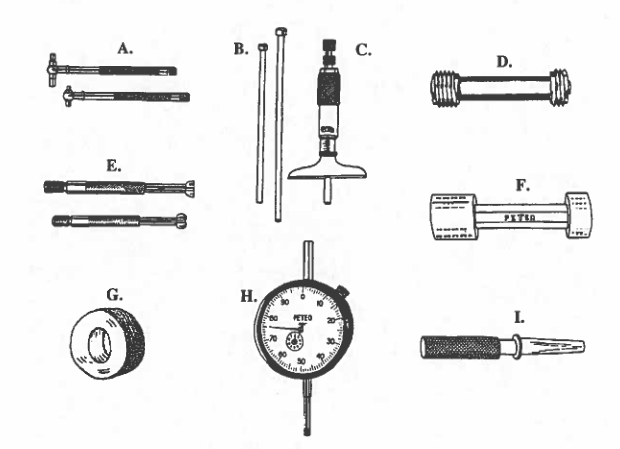
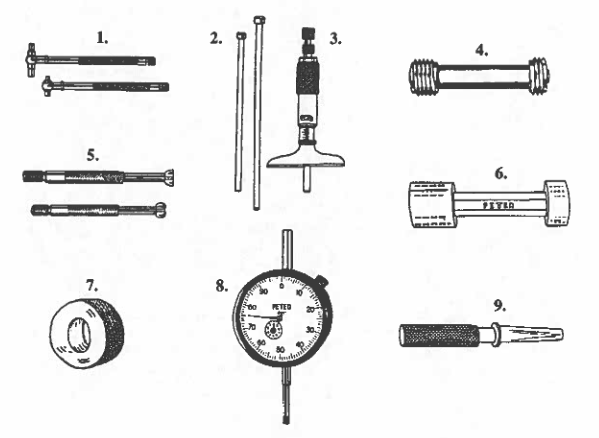
Listening Test: Look at the pictures. Listen to the names of the instruments. Write the letter of each measuring instrument.
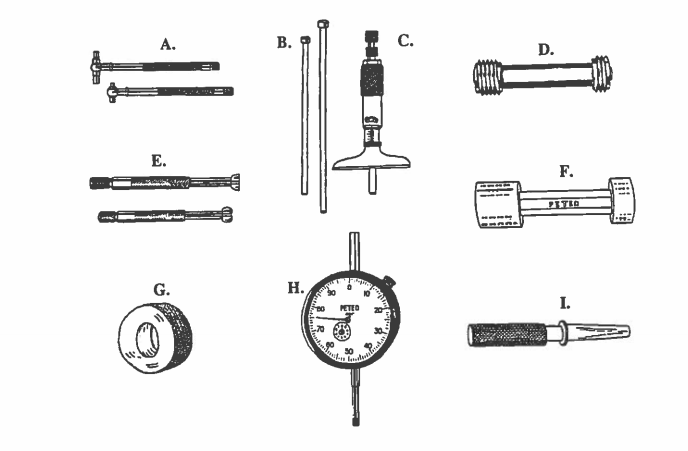
|
1. . |
6. . |
|
2. . |
7. . |
|
3. . |
8. . |
|
4. . |
9. . |
|
5. . |
|
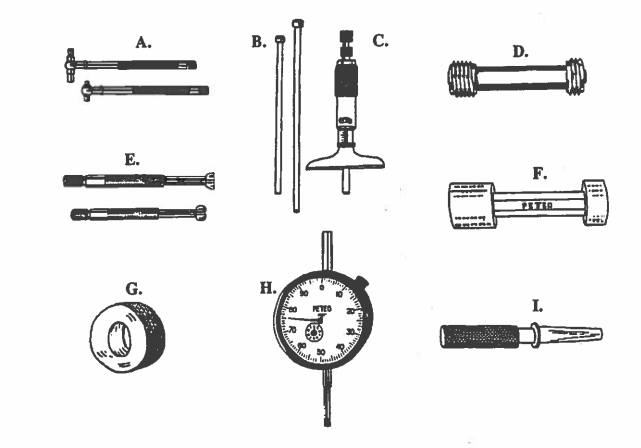
Writing Test: Look at the pictures. Write the names of each measuring instrument.
|
A. . |
F. . |
|
B. . |
G. . |
|
C. . |
H. . |
|
D. . |
I. . |
|
E. . |
|
