Lesson 1: Measuring with a Steel Rule
Rules
WORD LIST FOR STEEL RULES
KINDS OF STEEL RULES
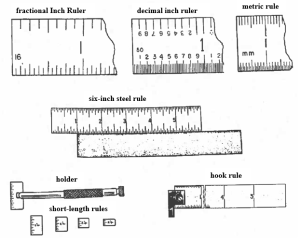
In this lesson there are pictures of three different steel rules, using three different units of measurement: the fractional inch, the decimal inch, and the millimeter (for metric rules). These rules are made of very hard steel and usually have several scales with different subdivisions stamped into the metal.
Fractional Inches and the Fractional Steel Rule: The common division of the fractional inch is into these fractional units: 1/64, 1/32, 1/16, and 1/8 of an inch. The lengths of the rules can vary between 1 and 72 inches. A very common rule used by machinists is the one that you checked out with this lesson: It is a 6-inch steel rule with four scales: the numbers 8 and 16 are stamped on one side to tell us that the inch is divided for us into 8 equal parts, each 1/8 in. long and 16 equal parts, each 1/16 in. long; the other side is stamped 32 for 32nds of an inch and 64 for 64ths of an inch.
Please examine the rule now to see the four scales. You will see that the rule has the 32nd scale numbered every 4 marks: 4, 8, 12, 16, 20, 24, and 28 to show you the number of 32nds at that point. The 64th scale is numbered every 8 marks: 8, 16, 24, 32, 40, 48, and 56 to show you the number of 64ths at that point. Look at these examples:
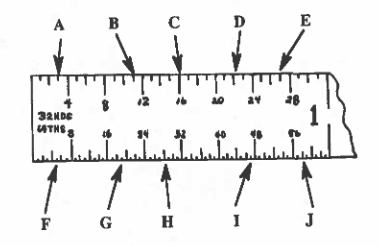 Let’s practice reading from this enlarged scale—it’s four times as large as an inch on the real 6-inch steel rule.
A: We see that A is on the 32nds scale; it is one mark this side of the number 4, so it is 3/32 in.
B: It is one mark this side of 12, so it is 11/32 in.
C: It is exactly at the 16 mark, so it is 16/32 in., which = 1/2 in. (after reducing).
D: It is at the 22 mark, so it is 22/32 in., which = 11/16 in. (after reducing).
E: It is one mark this side of the 28 mark, so it is 27/32 in. (not able to be reduced).
F: We see that F is on the 64ths scale; it is three marks this side of the 8 mark, so it is 5/64 in.
G: It is three marks past the 16, so it is 19/64 in.
H: It is four marks past the 24, so it is 28/64 in., which = 7/16 in. (after reducing).
I: It is one mark short of the 48, so it is 47/64 in. (can’t be reduced).
J: It is two marks past the 56, so it is 58/64 in., which = 29/32 in. (after reducing).
Study the real 6-inch steel rule, and then do the practice on the next page. The 64ths will be the smallest division of the inch that we will make for ordinary reading. If we had a smaller division (e.g., 128ths), it would require a magnifying glass to read.
The steel rule which you hold can also be used as a straight edge:
a. You could use the edge of the ruler to draw very straight lines, by laying the rule down and running the point of a pencil or pen along the edge to the desired length.
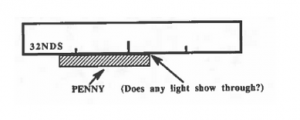
b. You could also use the edge of the ruler to test the flatness of a surface: Hold the edge of the rule on the surface you wish to test for flatness; if you see light shining under the bottom of the rule you know the surface is not flat; you could use the rule to test the flatness of a part you have made.
The rule itself is made of flexible, tempered steel and is perfectly flat.
Exercises: Reading the Inch rule
Activity: THE STEEL RULE AS A STRAIGHT EDGE
Drawing Lines
5.1 DRAWING LINES
MEASURING SMALL DIMENSIONS
MORE KINDS OF STEEL RULES
Decimal Inches and the Decimal Steel Rule: There are also steel rules which divide the inch into tenths (0.100 in. = 1/10 in.) and into hundredths (0.010 in. = 1/100 in.), as well as twentieths (0.050 in. = 1/20 in.) and fiftieths (0.020 in. = 1/50). These scales are useful for dimensions smaller than 1/64 in. (1/64 in = 0.015625 in.). Many of the other instruments you will use will give lengths in decimal inches; it is very important that the machinist be able to work easily with decimal parts of an inch and to read decimal measurements accurately.
It may be difficult for you to read the small lines on a decimal inch rule, so let us look at an enlargement of the decimal inch:
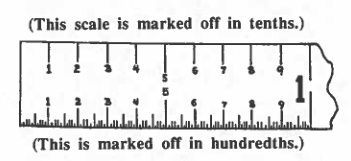 The upper scale is marked off in tenths of an inch, and the lower scale is marked off in hundredths. When we look at a length between any two of the numbered tenth marks in the bottom scale, we see that the tenth is divided into ten smaller pieces; each of these is equal to one hundreth of an inch–Let’s look at this subdivision of the tenth:
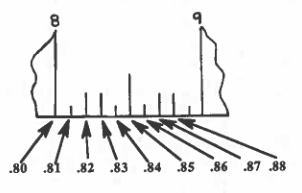
The line half way between the 8 and the 9 is always a 5; here it is equal to .850 in. Between .800 and .850, there are two taller lines, .820 and .830; the two shortest lines are around them, .810 and .840.
Best practice for USING KINDS OF STEEL RULES
When using a steel rule (of any kind—fractional, decimal, or metric), it is good to remember that the ends of the steel rule can become worn after much use. Therefore it is good to use the one inch mark as the starting place for any measurement that needs to be exact; then subtract one inch from the total.

NOTE: A mark is located at 2/10 in.; 2/10, when written as a decimal, could be written .2, or .20, or .200, or .200000; the zeroes at the end of a decimal do not change the value of the decimal: 2/10 and 20/100 are equal (2/10 = 1/5 and 20/100 also = 1/5). It is usual, in machine shop work, to c write a decimal with 3 or 4 places, e.g. .005″ , .500″, .0025″, .250″.
You’re doing great! Keep up the good work!
MEASURING WITH THE STEEL RULE
There are three important things that have helped the manufacturing of products like cars, refrigerators, and planes: (1) standard sizes, (2) interchangable parts, and (3) mass production.
1. Standard sizes: Because manufacturers around the world have accepted the standard sizes, it is possible to buy a screw or bolt in any part of the world and know that, when you get it, it will fit. Many products are made to a standard size. This standard-size idea has been somewhat weakened by the fact that we have had two competing systems of measurement: the U.S. Customary system (using inches and fractions) and the International Metric System (using millimeters and decimals). Having two systems of measurement has caused confusion for many, both in and out of the machinist trade.
2. Interchangeable parts: Whether a part has a standard size or not, the usual practice is to make parts that are interchangeable, i.e., parts which are all made from the same material and have the same size dimensions within the limits of a given tolerance. That means that, when you order a replacement part, you know it will fit when you have removed the old one.
3. Mass production: Because there are standard size fasteners (like screws and bolts) and because there are interchangeable parts, manufacturers can mass produce these parts and know that they will have buyers that can use their products. A customer does not need to call a manufacturer and tell them to make a dozen 3/4 in. flat head screws; the customer knows that this kind of screw has already been mass produced.
For these reasons, it is very important that the machinist be able to make many parts which are accurate and will truly interchangeable. To help him/her, a machinist’s measuring tools are very important. The tools will be used to measure the dimensions of the parts and to insure the accuracy of the dimensions. Many of these tools are made with great accuracy themselves, and are able to measure dimensions within .001 or .0001 in. We sometimes call these tools by the name measuring instruments, because they are like a fine watch, made with high accuracy and care.
It is important to respect these instruments, handle them with care, keep them clean, and store them away from injury when not in use.
Worksheet
5.1 Worksheet
3. Other Steel Rules:
a. Metric Rules: The metric rule is divided into numbered centimeters and then into ten subdivisions of each centimeter; each subdivision is one millimeter in length; 1cm = 10 mm. Metric measurements are used all over the world. in Mexico, Canada, Japan, and Germany. The USA does not use metric measurements; instead, the fractional and decimal inches are used in machine shops of the USA.
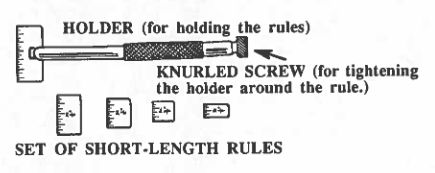
b. Short-Length Rules: Sometimes it is difficult to measure inside a hole or in a narrow place. A short-length rule, held at the end of a holder, will do the job. A set of short-length rules will include little rules of these lengths: 1/4″ , 3/8″ , 1/2″ , 3/4″, and 1″.
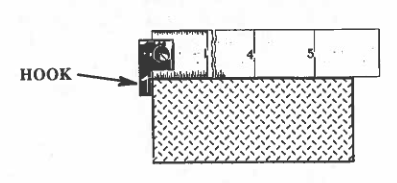
c. Hook Rule: This rule has a hook at the end of the rule; this hook is perpendicular to the edge of the rule at the 0″ mark. The hook can be used to measure distances from the edge of something.
Situation: Manuel, a student, is asking Pedro, a machinist, about how to use a steel rule.
CONVERSATION # 1:
M: Pedro, help me learn how to use this steel rule.
P: Sure! I’ll be glad to! First of all, tell me what’s the complete name of the tool.
M: It’s called a six-inch fractional steel rule.
P: Very good! And what’s it made of?
M: It’s made of tempered steel and has been ground very flat.
P: Yes! That’s great! And what does “tempered” mean?
M: It means that the steel for the rule was heated and then suddenly cooled to make it extra hard.
P: Hey, you already know a lot!
CONVERSATION # 2:
M: You still haven’t shown me how to use the rule.
P: Yeah, you’re right! It’s one thing to know the theory–it’s another to put it into practice.
M: Maybe you could start by telling me what these stamped numbers mean: 8, 16, 32, and 64.
P: One of those numbers is stamped at the end of each scale on the rule. There’s 4 scales and 4 numbers. The number tells you how many smallest subdivisions are in an inch.
M: So if I see a 32 at the end of a scale that means the inch is divided into 32 little pieces shown by the marks.
P: That’s right! Each piece will be equal to 1/32 inch. You’re a quick learner, Manuel!

