Lesson 5: Title Block
MORE INFORMATION FROM THE (Blue)PRINT
6.5 Introduction
Below are other things that may be on a (blue)print. Answer True for any items that you think will be needed by the machinist to make a part correctly.
WORD LIST
| 1.) title | the name of a book or other written work. e.g., Fred, what is the idle of that book you’re reading? |
| 2.) block | a large number of people or things taken together as a unit. e.g., In the title block of a blueprint, many sections of information are brought together. |
| 3.) additional | added onto what is already there. e.g., We need additional information in order to make this part correctly. |
| 4.) to treat | to put through some chemical process in making something. e.g., This steel tool should be treated with high heat and a dipping into that oil.Related Words: heat treated = to change the inside structure of a metal by high heating. |
| 5.) to fold | to bend so that one part is over another. e.g., “Li, fold that blueprint and put it away until tomorrow.”Related Word: to unfold = to open something up that had been folded. |
| 6.) document | anything written or printed in order to record or prove something. e.g., A blueprint is a document that shows how a part is to be made. |
| 7.) descriptive | concerning words that tell about something or give further details. e.g., The drawing title of a blueprint gives a main word, plus other descriptive words. |
| 8.) upside down | with the top side or edge turned to the bottom or underneath. e.g., Carla hung her husband’s picture upside own after the divorce. |
| 9.) file | a place in which to put a piece of paper or a document that will be needed later. e.g., We looked through many files, but we couldn’t find the blueprint, Number 5G4273-2. |
| 10.) sheet | a rectangular piece of paper, usually cut to a certain size. e.g., This blueprint is made up of four different sheets. |
6.5 Vocabulary Practice
THE (Blue)PRINT TITLE BLOCK
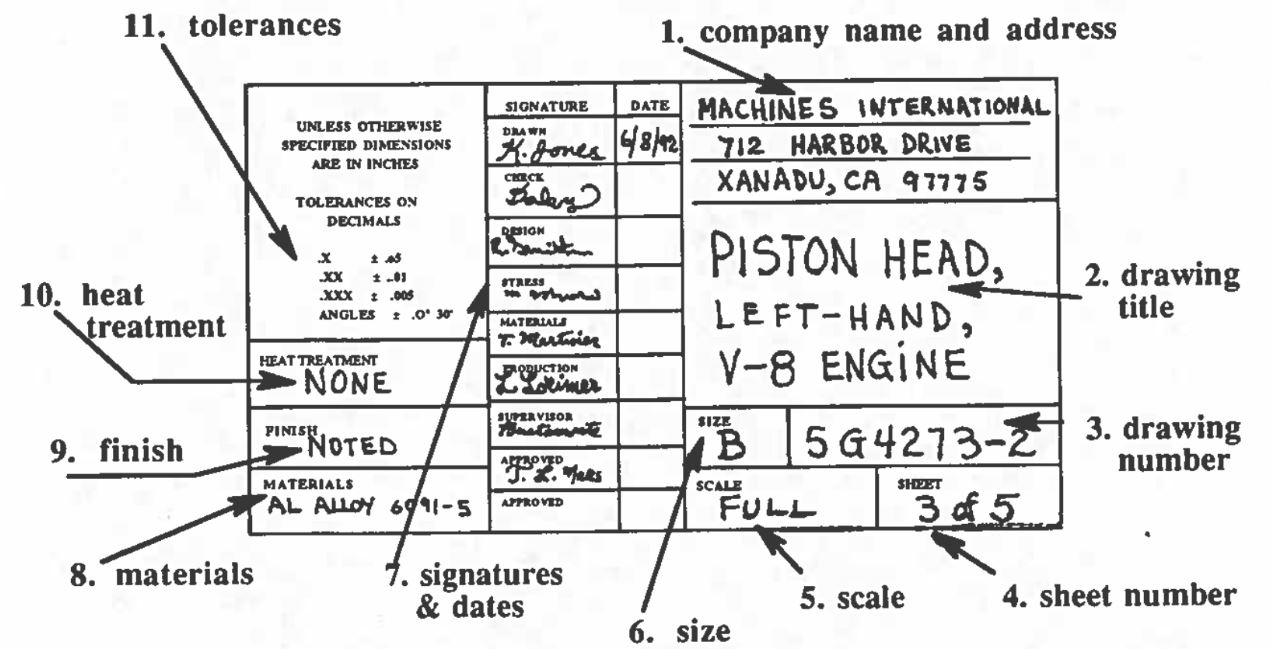
The three views, with their dimensions, are the most important informa- tion given or the blueprint, because they help the machinist to visualize the fin- ished part. But the three views are not enough. Additional information is needed to tell the machinist the name of the part, the kind of material to use, whether the part is to be heat treated, what kind of finish the part will have, and many other things like these. Much of this information is given in the title block.
The title block is usually drawn in the lower right hand corner of the blueprint. It is placed there, so it can be easily seen when the blueprint is folded.
Below, a typical title block can be seen as it might appear on a blueprint. Let’s learn what kind of information a title block usually contains and why that information is included.

PARTS OF THE TITLE BLOCK
1. Company name and address: Like a letter or other important document, the blueprint should carry the name of the company and their address. This will name the owner of the blueprint for identification and for any sort of legal matter that might come up in the future.
2. Drawing title: This tells the machinist the name of the part or assembly that he/she is working on. The title always gives: first, the name of the part; second, any descriptive information that makes it more clear what the part is; in our example above, we are talking about a piston. It’s a piston for the left-hand side of a V-8 engine. When you read the title, put the descriptive words before the main title: “a left-hand, V-8 engine piston.”
3. Drawing number: This number is printed near the bottom of the title block. The number is used to identify the blueprint and to control where the blueprint goes when it is not stored. The drawing number can also be printed in several other places on the blueprint, so that if the print is folded incorrectly or stored in an upside-down position, it will still be visible in its file.
e.g., 5 G4273-2
You will notice that the drawing number ends with a dash and a number; together they are called a dash number. This number can be used to give special information when it is needed.
4. Sheet number: This space at the bottom comer of the title block tells two things: (1) how many sheets are used for this blueprint; and (2) which of the sheets you are seeing. E.g., ”3 of 5″ means you are looking at the 3rd sheet in a series of 5 that are required for this particular blueprint.
5. Scale: This space is used to tell how the size of the part on the blue- print compares with the real part.
Sometimes the part on the paper will be actual size (the same size as the real part)–then the print will say FULL or I:/ (one-to-one) to tell the reader thai the drawing of the part is actual size.
At other times, the drawing will be smaller than actual size, e.g. 1/2” : 1” (one-half actual size)–the size of the drawing is given first, the size of the actual part is given second. Sometimes the drawing is larger than actual size, e.g. 2. I (twice actual size). If the scale box says NOTED, then different scales are being used on the drawing, and it will be necessary to find notes on the drawing that tell what scale is being used at a particular place.
6.4 More vocabulary practice
WORD LIST
| 1.) code | a system of symbols that stand for words, numbers or other information items. e.g., A one of letters is used to represent the various sizes of blueprint sheets. |
| 2.) signature | a person’s name, as written by that person. e.g., Jorge wrote his i natu e at the bottom of the check.Related Word: to sign = to write your own name on something. |
| 3.) to approve | someone in authority says that it is okay to do something. e.g., The Chief Engineer approved the production of the part.Related Word: approval = the act of approving something. |
| 4.) stress | the amount of force put on a body that will try to bend or twist its shape. e.g., An engineer is chosen to test how much stress a part can take until it breaks. |
| 5.) available | can be gotten, had, or reached. e.g., There were no tickets available to hear Los Tigres del Norte when they came to San Diego.Related Word: availability = ability to be had. |
| 6.) separate | set apart in a different place than the other things in the group. e.g., The Gomez family bought a separate telephone for their daughter, Claudia. |
| 7.) finish | the way in which the surface is left when the part is complete: ground, lined, polished, lapped, painted, etc. e.g., The finish on that tool is a high polish. |
| 8.) to quench | to put a heated piece of metal into a cold bath of water or oil. e.g., Heat treating metal has two steps: heating the metal and quenching it. |
| 9.) furnace | an enclosed chamber in which high heat is produced. e.g., Jake put the parts into the furnace for heat treating. |
| 10.) diagonal | a line running between two opposite comers. e.g., She drew a diagonal from the top left to the lower right. |
Exercises Practice with more vocabulary
THE (Blue)PRINT TITLE BLOCK (continued)
6. Size: Different letters of the alphabet are used as a code to tell the
reader the size of the sheets on which the blueprint is printed. Here is the code.
Letter Size of the sheets
A 8.5 x 11 or 9 x 12
B 11 x 17 or 12 x 18
C 17 x 22 or 18 x 24
D 22 x 34 or 24 x 36
E 34 x 44 or 36 x 48
7. Signatures and dates: This part is for the signatures of those who are approving the blueprint and the manufacturing steps that are contained in the blueprint. There is also a date to tell when the print was approved. These sig- natures insure that people will check the blueprint carefully and will put their names to it; if something goes wrong, the signers can be held accountable. This reminds us again of the importance of accuracy.
Some of the required signatures are these:
a. drawn: the drafter’s signature and when he/she completed the drawing.
b. check: an engineer who inspected the drafter’s drawing for accuracy.
c. design: an engineer who designed the part that the drafter drew.
d. stress: an engineer who calculated how much stress the part can take.
e. materials: the person who checks on the availability of the material needed to make the part.
f. production: an engineer who approves if the part can be produced or not.
g. supervisor: the person who supervises the drafter at his/her work.
h. approved: for any other approvals that may be needed.
Exercises: Practice with Sheet Sizes and Signatures
THE (Blue)PRINT TITLE BLOCK (continued)
8. Materials: This section of the title block will tell what kind of material the part is to be made of. Sometimes, if there are many materials used in the making of a part or an assembly, there can be a whole List of Materials with its own separate block located above the title block.
9. Finish: The “finish” of a part means what the surface of the part is like when the machinist finishes the part. There are a variety of “finishes” that a part can have: sometimes there is a regular pattern to the lines that the cutting tool makes (e.g., waves, circles, lines, etc.):
 Sometimes the surface is polished or lapped (cf. Mod 5, Less 4, p. 13); at other times the surface of the part is coated with paint or some other chemical. The finish that the engineers want is usually given in a note; the finish section of the title block will say “NOTED.”
10. Heat treatment: Steel and other metals can be hardened by heating them and then cooling them quickly by putting them in water or oil, or by letting them cool in the air. When a part is heat treated it usually very hard on the out- side and is tougher on the inside; drill bits and other tools can be hardened to last longer on the job. Putting a heated part into water or oil is called quenching. Special furnaces are used for the heat treating.
If a part requires heat treating and hardening, this will be noted on the blueprint in a special note or in a separate block of Creations. The heat treatment section of the title block can say AS REQUIRED or NOTED.
If it does not require heat treating, it will say NONE or will have a diagonal drawn through it from one comer to the other.

WORD LIST
| 1. to specify | to include in a set of specifications. e.g., The blueprint specifies that all measurements are given in inches. |
| 2. unless otherwise specified | this is generally true unless a particular note says something different. e.g. All the dimensions on this blueprint are given in inches, unless otherwise specified by a note. |
| 3. couple | two, or an indefinite small number, a few. e.g., I want to ask you a couple of things. |
| 4. to stand for | to represent, to symbolize. e.g., The letters INS for the words Immigration and Naturalization Service. |
| 5. to get something done | to complete, to finish something. e.g., I must get my work done before I can go to the movie with you. |
| 6. to get someone started | to help someone begin working on something. e.g.. Maria cot her son started on washing the dishes. |
| 7. to wheel | to push a wheeled vehicle along. e.g., The lady with the broken leg was wheeled into the courtroom. |
Exercises Practice with more new vocabulary
THE (Blue)PRINT TITLE BLOCK (continued)
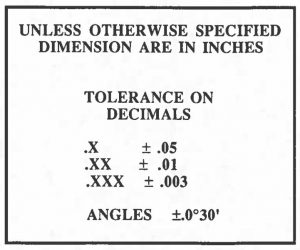
11. Tolerances: This section of the title block tells the reader what the tolerances are for one-, two-, and three-place decimals and for angles. You may see a section like this in the title block; here it is enlarged for easier reading:
 Some examples of how the chart works are these: If you have a dimension of .7 inches, the tolerance is ±.05, because the dimension is a one-place decimal; therefore the limits of the dimension are .7 ± .05 = .65 to .75 inches.
If another dimension were given as 1.37 inches, the tolerance would be ±.01, because of the two-place decimal; therefore the limits of the dimension are 1.37 ± .01 = 1.36 to 1.38 inches.
If a third dimension were given as 4.075 inches, the tolerance would be ± .005, because 4.075 is a three-place decimal; therefore the limits of the dimension are 4.075 ± .003 = 4.072 to 4.078 inches.
Exercises Comprehension Checks


Exercises: Practice with Title Block Vocabulary
Conversation Practice:
Conversation No. 1: A machinist, Neil Jones, is talking with his supervisor, Paul Tanaka.
Neil: Paul, I don’t understand a couple of things in this blueprint. Can you help me?
Paul: Sure, Neil. What do you need?
Neil: It’s this section in the title block about tolerances. I’m used to seeing the dimensions and the tolerances printed next to the views in the print. What are these Xs about?
Paul: You can see that there are three sets of Xs and that each set comes after a decimal point. Each X stands for a digit in a decimal. For example, .X stands for tenths, like .3 or .5 or .9. The section says that, on this drawing, any dimension given in tenths has a tolerance of + .05.
Neil: Oh, I see! And the next set of Xs is .XX–that’s hundredths, I guess–and the tolerance is + .01.
Paul: Yes, that’s right. And .XXX stands for thousandths in the dimen- sion. The tolerance there is + .006.
Conversation No. 2: Neil and Paul are talking later in the day.
Paul: Neil, you forgot to heat treat all those parts you made this afternoon. The parts were all acceptable, but they need to go in the furnace.
Neil: Thanks for reminding me, Paul. I was going to ask you how to do that, but I wanted to get them all done first. you show me how?
Paul: Yes, let’s wheel the cart over to the furnace, and I’ll get you started.
Neil: Why do they need to be heat treated?
Paul: Heating and quenching the part in oil will give a lot of hardness to the outside and toughness on the inside.

