Revision
Andy Gurevich
Higher vs. Lower Order Concerns

under CC BY-NC-ND 2.0
After you have written a draft, sometimes you will need to make changes. In a college writing class, your instructor probably has requirements about revising your work. While you may feel that you write best “under pressure” the night before your assignment is due, writing a single draft at the last minute rarely results in your best work. You may also find that in college writing, you have to do more than simply write in correct sentences and organized paragraphs. You may feel that you’ve put a lot of effort into your first draft, and it can be challenging to think about changing your work or even eliminating words that you toiled over. But it’s well worth the pain of revising to produce a polished piece of writing that others can easily understand. Your instructor will expect that you have carefully considered the writing task, possibly done some research, and given considerable thought to your ideas and to the needs of your reader/audience. It’s unlikely that you will be able to do so without taking time in between drafts to reconsider your ideas and then revise your draft.
To revise a piece of writing, it may help you to think of three separate ways to improve your writing even if you combine those three ways or move back and forth between them. You can look at the big picture, check your organization, and also edit and proofread your final draft.
. . . . . . . . . . . . . . .
Higher Order Concerns
Revising for higher order concerns means changing and revising sections of your paper and working on the organization of your ideas.
When you revise at the “big picture” stage, you are looking at the most important aspects of the writing tasks, and the ones that require the most thought. Here’s a set of questions to help you revise for these higher order concerns:
- Have I met the purpose and requirements?
- Does my draft say what I mean?
- Have I changed my thinking through writing or researching?
- Are there parts that do not belong here? (For more help with this, see “Reverse Outlining” later in this section of the text.)
- Are there pieces missing?
- Are there places where the writing does not make sense?
- Is the tone right for my reader?
- Are my sources the right kind for my purpose and reader?
- Are all the pieces in the right place?
- Are sources documented?
Lower Order Concerns
Lower order concerns focus on editing and proofreading.
Perhaps you are the person who proofreads and edits as you write a draft, so when you are done drafting and revising for content and structure, you may not have that much editing or proofreading to do. Or maybe you are the person who pays no attention to grammar and spelling as you draft, saving all of the editing until you are finished writing. Either way, for college work (and professional work), plan to carefully edit and proofread your work. For most people, proofreading on a printed copy is more effective than working entirely on screen. Editing is the act of making changes or indicating what to change; proofreading means checking to make sure those changes were made.
Reverse Outlining

CC0 Public Domain Image from Mega Pixel
Often, outlining is recommended as an early component of the writing process, a way to organize and connect thoughts so the shape of what you are going to write is clear before you start drafting it. This is a tool many writers use that is probably already familiar to you.
Reverse outlining, though, is different in a few ways. First, it happens later in the process, after a draft is completed rather than before. Second, it gives you an opportunity to review and assess the ideas and connections that are actually present in the completed draft. This is almost an opposite approach from traditional outlining, as the traditional pre-writing outline considers an initial set of ideas, which might shift as the draft is actually being written and new ideas are added or existing ones are moved, changed, or removed entirely. A reverse outline can help you improve the structure and organization of your already-written draft, letting you see where support is missing for a specific point or where ideas don’t quite connect on the page as clearly as you wanted them to.
How to Create a Reverse Outline
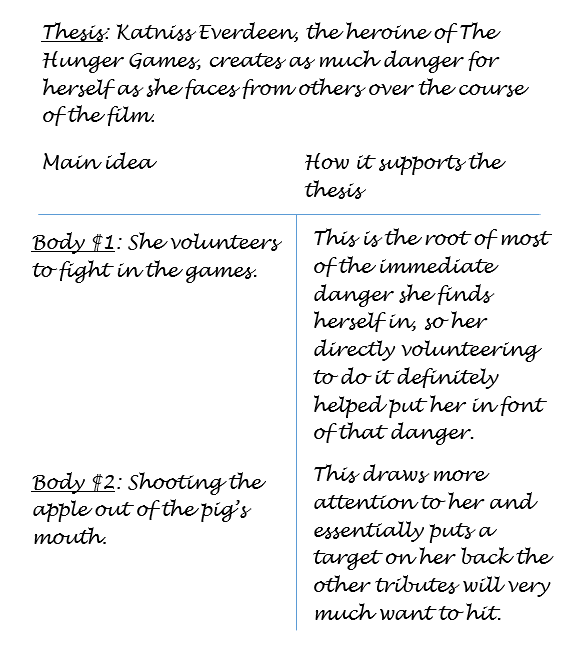
- At the top of a fresh sheet of paper, write your primary thesis or claim for the text you want to outline. This should be the thesis exactly as it appears in your draft, not the thesis you know you intended. If you can’t find the actual words, write down that you can’t find them in this draft of the paper—it’s an important note to make!
- Draw a line down the middle of the page, creating two columns below your thesis.
- Read, preferably out loud, the first body paragraph of your draft.
- In the left column, write the single main idea of that paragraph (again, this should be using only the words that are actually on the page, not the ones you want to be on the page). If you find more than one main idea in a paragraph, write down all of them. If you can’t find a main idea, write that down, too.
- In the right column, state how the main idea of that paragraph supports the thesis.
- Repeat steps 3-5 for each body paragraph of the draft.
Once you have completed these steps, you have a reverse outline! It might look a little something like this (this one is only looking at two paragraphs of a draft for the sake of example; yours will likely be looking at more paragraphs than just two):
Working with the Results of Your Reverse Outline
Now what? You’ve probably already made some observations while completing this. Often students will speak up in class after we create these to tell me that they notice places where they are repeating themselves or that some of their paragraphs have too many points or don’t clearly support the thesis.
There are a number of observations that can be made with the aid of a reverse outline, and a number of ways it can help you strengthen your paper. Try considering the following questions as you review yours.
Do Multiple Paragraphs Share the Same Main Idea?
If so, you might try combining them, paring back the information for that specific idea soit doesn’t feel imbalanced in how much space it takes up, and/or organizing these paragraphs about the same point so they are next to each other in the paper.
Do Any Paragraphs Have Multiple Main Ideas?
Each paragraph should have only one primary focus. If you notice a paragraph does have more than one main idea, you could look for where some of those ideas might be discussed in other paragraphs and move them into a paragraph already focusing on that point, or select just the one main idea you think is most important to this paragraph and cut the other points out, or you might split that paragraph into multiple paragraphs and expand on each main idea.
Do Any Paragraphs Lack a Clear Main Idea?
If it was hard for you to find the main idea of a paragraph, it will also be hard for your reader to find. For paragraphs that don’t yet have a main idea, consider whether the information in that paragraph points to a main idea that just isn’t written on the page yet. If the information does all support one main idea, adding that idea to the paragraph might be all that is needed. Alternatively, you may find that some of the ideas fit into other paragraphs to support their ideas, or you may not need some of them in the next draft at all.
Do Any Main Ideas Not Connect Clearly and Directly Back to the Thesis?
Since the point of almost every paper is to support its thesis statement, this one can be critical. It should be clear how the main idea of each paragraph supports the thesis or claim of the paper. If that connection is not directly stated, ask yourself how the main idea of that paragraph furthers your thesis and then write that response.
Do Ideas Flow from Paragraph to Paragraph? Are There Gaps in Reasoning?
If a paper starts out introducing something that is a problem in a community, then presents a solution to the problem, and then talks about why the problem is…well, a problem, this organization is likely to confuse readers. Reorganizing to introduce the problem, discuss why it is a problem, and then move on to proposing a solution would do good work to help strengthen the next draft of this paper.
Note that you may need to move, revise, or add transition statements after moving paragraphs around.
Editing
When you are working on improving the grammar, spelling, punctuation, and other formal aspects of your writing, instructors usually refer to that task as editing (not revising).
Use a checklist to ensure you are catching errors and actually fixing them. You may have seen examples of editing checklists. One type of checklist is a general list of common errors that writers often make; another type is a checklist based on an assignment; and a third type is a checklist you make yourself that tracks the kinds of errors you make most often. See the Grammar and Style Appendix for examples.
Using Technology to Edit
Computers revolutionized the way that we edit writing. Here are some useful tools to make editing easier and faster.
Find and Replace: If you know that you frequently make the same spelling or punctuation error, use the Find and Replace function in your word processor (in most, pressing and holding the “CTRL” key and then simultaneous pressing the “F” key will get you to the Find and Replace function). For example, if you know that you often type “though” instead of “through,” you can search for all instances of “though” and replace them, one by one, with “through,” checking each item to be sure you are making the right choice.
Spell checkers: Always use spell check. Do understand that spell check cannot find misspellings that are actual words. Spell check should mark “tge” as an error, but if you typed “accept” when you meant “except,” spell check will not help you. (See “Find and Replace” in the previous paragraph.)
Grammar checkers: Grammar checkers are sometimes correct, sometimes not. If you use a grammar checker and disagree with a suggested correction, use other resources such as dictionaries, grammar handbooks, or websites like Purdue OWL to determine what is correct. If you find that you often make a certain kind of mistake, it’s worthwhile to study up on the topic and perhaps keep an editing checklist (see the Grammar and Style appendix) to help you remember to check for that type of error. Whatever you do, don’t start randomly changing things just to make the grammar marks go away!
Screen readers: Sometimes it helps to hear your words aloud. Using a screen reader can do that for you, and it will definitely read a mistake as a mistake, without correcting it. Many word processing programs have a screen reader built in. There are also apps you can purchase, and some schools provide applications to students for free.
Document Format, Documentation Style, and Proofreading

CC0 Public Domain, via Wikimedia Commons
Document Format
Make sure that you have formatted your document as required for the writing task. If you are writing an essay in MLA or APA style, make sure that you have checked for the correct margins, header, first page heading, cover page if required, page numbering, spacing, and other formatting details. If you are writing for the web, make sure that you know where to find the style guide or guidelines for the type of document you are working on. Writing a personal blog has different requirements than writing a professional blog for a website.
Here are some resources to help you:
- To learn more about MLA essay format, see the Purdue OWL article, “MLA General Format.”
- To learn more about APA essay format, see the Purdue OWL article, “APA General Format.”
- Also, see the “Using MLA to Format Your Documents” portion of the “Resources for Working with MLA” appendix of this text.
Documentation Style
Whenever you use material from another source, whether that means images, text, ideas, or media, you must do so ethically by giving credit to the originator. If you are writing a college essay, that usually means using either MLA or APA style. For academic writing, citing within your essay and also providing a bibliography are required. When writing for the web, you may be providing links to the original source and/or a list of sources.
Here are some resources to help you:
- To learn more about MLA documentation, see the Purdue OWL article, “MLA Formatting and Style Guide.”
- To learn more about APA documentation, see the Purdue OWL article, “APA Formatting and Style Guide.”
- Also, see the “Four-Step Process for Working with Sources” portion of the “Resources for Working with MLA” appendix of this text
Proofreading
Proofreading is the final step, and it means using a system to ensure you’ve made all the corrections necessary.
Using a System
Circle, highlight, underline: Select one method to mark all the corrections you want to make. You might choose to circle, underline, or highlight all errors you find. Check off each circle, highlight, or underline when you make the correction in the electronic document.
Check marks and checkboxes: Some writers make a check mark in the margin for every error they find in a line of typing, then put a slash through the check mark once it is corrected. You can also make checkboxes and then check the box once the correction is made.
Using editor’s marks: You may have certain marks that you have learned to make for some kinds of errors, either from an instructor or from professional editing marks. If so, feel free to use those. For an extensive list of editing marks, consult the NY Book Editor’s Guide to Copyediting Marks (at nybookeditors.com).
Giving and Receiving Feedback
In many writing classes, students are expected to learn how to give feedback to their peers. This task is usually called peer review, a concept you will also learn about when you begin to use academic research. At first, this may seem intimidating. Writers may think, “I’m not a teacher–how can I give useful feedback to another writer?” What writers CAN do is give their peers an honest reaction as a reader and give advice based on their own experience. It is ultimately up to the writer to decide if they want to make sure of the feedback given. If you feel unsure of your ability to give feedback, remember that you are learning from the process. In a class, the other students will also receive feedback from the instructor.
This understanding may also help students who don’t feel that other students are qualified to give feedback. If you feel that the advice given to you by a peer isn’t right, you can choose to ignore it or decide to check with your instructor first. Remember that your peers are learning how to give feedback, just as you are.
Giving feedback on writing is a powerful skill that you may use outside of school for work projects, for personal writing, or even to help your children with their homework.
Giving Peer Feedback
When your role in peer review is to give feedback, your job is to help the writer by giving your reaction as a reader to the writing. Think about the kind of feedback you would like to get and also how you would like that feedback to be given. What follows here are some basic rules to follow for responding to someone else’s writing.
First, listen to the writer. What kind of feedback are they asking for? Do they want to know if their thesis is clear? Do they have questions about citing sources? Make a note about what kind of feedback the writer has requested and keep that in mind as you respond.
Be kind. When you are receiving criticism, isn’t it easier to hear if the person giving the criticism is kind and respectful to you? Do the same for your peer.
Comment on the higher order concerns first. That means asking questions about anything that confuses you, checking to see if the writing did what the assignment called for, and considering if the order of the paper makes sense. Sometimes your instructor will give you specific things they want you to comment on; if so, be sure you do so.
Use “I” statements to help stay focused on your reaction to the writing. For example, instead of saying, “You aren’t clear in this paragraph,” try saying, “I’m confused in this paragraph. Did you mean X or Y?”
Be specific. Never say “I liked it” or “It was good” unless you follow up with an explanation of exactly what you liked or thought was good. The same goes for criticism; say exactly what confused you or what was missing.
Ask questions. Use questions to clarify what the writer means, what the resources given are saying, and what the writer is trying to do.
Offer advice based on your own experience. For example, you could say “if this were my paper, the two things I would do next are A and B.” Provide options such as, “If you wanted to expand this, you could do A, B, or C.”
Don’t try to make the writer sound like you. If a word is the wrong word, note that, but if you just think of a word you like better, that’s just a matter of style and voice.
Don’t edit your peer’s writing for them. Only comment on editing when the writing is a final draft or when your instructor has included checking for errors in the instructions for peer review. Correcting errors is important at some point, but it makes no sense to spend time editing a paragraph if that paragraph may needs to be deleted or changed. It’s okay to remind the writer to run spell check and grammar check if you notice minor errors. Otherwise, only ask about editing errors if you have trouble understanding the sentence because of the mistakes. If your instructor does want you to comment on editing, be sure to follow the instructions. Remember that the responsibility for correcting the errors lies with the writer, not with you.
When providing peer feedback, it can be helpful to have an understanding of higher order and lower order concerns. See “Higher vs. Lower Order Concerns” in the “Revising” section to learn more.
Make the Most of Peer Feedback
Now let’s consider your role in receiving feedback, not giving it. Are you eager to get feedback? Scared to share your work? If you are receiving feedback from your peers, remember that ultimately you get to decide what feedback to accept. If you don’t think the feedback is correct, ask your instructor what they think. And give your peers a break; they are also just learning how to give feedback.
One way to improve the feedback you get is to ask for the kind of feedback you want. Don’t be afraid to give your peer reviewer some direction.
Listen to or read the feedback with an open mind. Consider that the peer reviewer is your reader. It’s good to know what a real reader got out of your writing.
If you aren’t sure about the feedback or feel upset about it, reconsider the suggestions after a break. It’s okay to say, “I’ll think about that.” If you feel that the reviewer is trying to change your style so that the paper doesn’t sound like you anymore, consider whether the feedback helps you make the paper better. If not, feel free to set that feedback aside.
Why Meet with a Writing Tutor?
Sometimes your instructor may ask you to visit the Writing Center, or it may even be a requirement for your class. Or you may just be curious about what a writing tutor has to offer. Many colleges have writing centers or subscribe to online services that provide tutoring in writing. What’s the benefit?
Writing tutors offer you another perspective on your writing. They serve as a real audience for your words and ideas. In addition to that, they have some additional expertise either because they are more experienced writers or they are writing instructors. Writing tutors also have experience with resources for writing that you may not be aware of.
Preparing to Meet with a Tutor
To prepare for a Writing Center session, print your paper out and consider printing a second copy to make it easier for both you and the tutor to read along at the same time. Be ready to take notes and listen carefully. It’s helpful if you bring the assignment or have access to it online. Your tutor will spend a few minutes in the beginning of the session figuring out what you are writing, what the requirements are, and when your work is due. They may ask what you have already done to improve the writing, and they will almost always ask you what you would like help with.
Keep in mind that your tutor will want to focus on a few important things rather than try to catch every little thing in your paper. Tutors won’t edit your paper for you, but they can help you learn how to edit your own work better. Don’t be surprised if your tutor shows you how to use a writing resource such as a handbook or the Purdue OWL online; part of the tutor’s job is to help you learn to navigate resources on your own, so that you eventually have the same tools as the tutor.
At the end of a session, the tutor will probably ask you what you plan to do next with your writing. That’s how they check to see that you got what you needed from the session and that you understood the advice given. After you revise your writing, you may want to schedule another tutoring session to work on additional aspects of the assignment.
What about Getting Help from a Friend or Family Member?
Getting feedback from a reader outside of your class can sometimes be a good idea. If you want to ask a friend or family member for feedback, set some ground rules. They should follow the same rules as a peer reviewer. At the very least, asking a friend or family member to read your paper aloud will help you hear how your paper sounds. You will probably catch more errors, too.
Preparing for a Student/Teacher Conference
Getting in-person help from your instructor is one of the best ways to receive feedback. You can prepare for a conference with your instructor so that you get the most out of it. Usually, a conference happens with just you and your instructor. Friends aren’t invited, and parents can only attend with your permission due to the Family Educational Rights to Privacy Act (FERPA). See this handy link to “FERPA General Guidance for Students” from the US Department of Education (found at www2.ed.gov).
Bring your best work to the conference. The more effort you have already made means that the instructor won’t waste time telling you things you already know you need to fix. Re-read your work before the conference and prepare some questions. What do you think is working? What do you need help with? During the conference, take notes. If the instructor writes anything down, ask if you can take their notes with you. At the end of the conference, work with your instructor on an action plan to revise your work.
(adapted, in part, from The Word on College Reading and Writing by Carol Burnell, Jaime Wood, Monique Babin, Susan Pesznecker, and Nicole Rosevear. This OER text is licensed under a Creative Commons Attribution-NonCommercial 4.0 International License, except where otherwise noted.)
